misterli's Blog.

misterli's Blog.

欢迎您访问misterli's Blog.

使用ssl-exporter监控ssl证书过期时间

虽然blackbox-exporter也可以检测证书过期时间,但是最近发现它偶尔采集到的部分证书的过期时间不太准确,于是用ssl-exporter去监控证书过期时间。

部署

1
2
3
4
5
6
7
8
9
10
11
12
13
14
15
16
17
18
19
20
21
22
23
24
25
26
27
28
29
30
31
32
33
34
35
36
37
38
39
40
41
42
43
44
45
46
47
48
49
50
51
52
53
54
55
56
57
58
59
60
61
apiVersion: v1
kind: Service
metadata:
labels:
name: ssl-exporter
name: ssl-exporter
namespace: monitoring
spec:
ports:
- name: ssl-exporter
protocol: TCP
port: 9219
targetPort: 9219
selector:
app: ssl-exporter
---
apiVersion: apps/v1
kind: Deployment
metadata:
name: ssl-exporter
namespace: monitoring
spec:
replicas: 1
selector:
matchLabels:
app: ssl-exporter
template:
metadata:
name: ssl-exporter
labels:
app: ssl-exporter
spec:
initContainers:
# Install kube ca cert as a root CA
- name: ca
image: misterli/alpine:3.7-china
command:
- sh
- -c
- |
set -e
apk add --update ca-certificates
cp /var/run/secrets/kubernetes.io/serviceaccount/ca.crt /usr/local/share/ca-certificates/kube-ca.crt
update-ca-certificates
cp /etc/ssl/certs/* /ssl-certs
volumeMounts:
- name: ssl-certs
mountPath: /ssl-certs
containers:
- name: ssl-exporter
image: ribbybibby/ssl-exporter:v2.2.0
ports:
- name: tcp
containerPort: 9219
volumeMounts:
- name: ssl-certs
mountPath: /etc/ssl/certs
volumes:
- name: ssl-certs
emptyDir: {}

注意

1、这里的initcontainer 用的修改过的alpine 镜像,替换镜像源为国内源,如果用官方镜像可能执行apk add --update ca-certificates时下载过慢导致超时失败,网络好的同学也可以直接使用官方镜像,这里用的修改过的镜像的Dockerfile如下:

1
2
FROM alpine:3.7
RUN echo -e http://mirrors.ustc.edu.cn/alpine/v3.7/main/ >> /etc/apk/repositories

2、ssl-exporter的镜像这里使用的最新的v2.2.0,网上很多文章中用的0.6.0不建议使用,因为镜像版本0.6.0 ,提供的指标和作者最新的dashboard 不一致。

prometheus抓取

这里我的prometheus是使用prometheus-operator安装的,有两种方式去抓取监控指标。probe方式适合于使用较新的prometheus-operator安装的prometheus,老版本prometheus-operator安装的prometheus 不支持probe 可以使用additional。

使用probe

prometheus使用PrometheusAlert进行聚合报警

本身prometheus已经有了alertmanager这个组件提供了一些报警媒介比如email wechat等,为什么我还还要使用prometheusalert呢?

Prometheus Alert是开源的运维告警中心消息转发系统,支持主流的监控系统Prometheus,Zabbix,日志系统Graylog和数据可视化系统Grafana发出的预警消息,支持钉钉,微信,华为云短信,腾讯云短信,腾讯云电话,阿里云短信,阿里云电话等,可以看出prometheusalert相比和alertmanager内置的报警媒介相比支持的更全面,并且配置和调试更方便,prometheusalert 并不能取代alertmanager,而是要作为webhoook与alertmanager结合使用。

安装

1
2
#Kubernetes中运行可以直接执行以下命令行即可(注意默认的部署模版中未挂载模版数据库文件 db/PrometheusAlertDB.db,为防止模版数据丢失,请自行增加挂载配置 )
wget https://raw.githubusercontent.com/feiyu563/PrometheusAlert/master/example/kubernetes/PrometheusAlert-Deployment.yaml

注意:这里需要修改一下文件中volumemount中使用的configmap名称,参见https://github.com/feiyu563/PrometheusAlert/issues(2021-01-26)

修改后文件如下

1
2
3
4
5
6
7
8
9
10
11
12
13
14
15
16
17
18
19
20
21
22
23
24
25
26
27
28
29
30
31
32
33
34
35
36
37
38
39
40
41
42
43
44
45
46
47
48
49
50
51
52
53
54
55
56
57
58
59
60
61
62
63
64
65
66
67
68
69
70
71
72
73
74
75
76
77
78
79
80
81
82
83
84
85
86
87
88
89
90
91
92
93
94
95
96
97
98
99
100
101
102
103
104
105
106
107
108
109
110
111
112
113
114
115
116
117
118
119
120
121
122
123
124
125
126
127
128
129
130
131
132
133
134
135
136
137
138
139
140
141
142
143
144
145
146
147
148
149
150
151
152
153
154
155
156
157
158
159
160
161
162
163
164
165
166
167
168
169
170
171
172
173
174
175
176
177
178
179
180
181
182
183
184
185
186
187
188
189
190
191
192
193
194
195
196
197
198
199
200
201
202
203
204
205
206
207
208
209
210
211
212
213
214
215
216
217
218
219
220
221
222
223
224
225
226
227
228
229
230
231
232
233
234
235
236
237
238
239
240
241
242
243
244
245
246
247
248
249
250
251
252
253
254
255
256
257
258
259
260
261
262
263
264
265
266
267
268
269
270
271
272
273
274
275
276
277
278
279
280
281
282
283
284
285
286
287
288
289
290
291
292
293
294
295
296
297
298
299
300
301
302
# apiVersion: v1
# kind: Namespace
# metadata:
# name: monitoring
---
apiVersion: v1
data:
app.conf: |
#---------------------↓全局配置-----------------------
appname = PrometheusAlert
#监听端口
httpport = 8080
runmode = dev
#设置代理 proxy = http://123.123.123.123:8080
proxy =
#开启JSON请求
copyrequestbody = true
#告警消息标题
title=PrometheusAlert
#链接到告警平台地址
GraylogAlerturl=http://graylog.org
#钉钉告警 告警logo图标地址
logourl=https://raw.githubusercontent.com/feiyu563/PrometheusAlert/master/doc/alert-center.png
#钉钉告警 恢复logo图标地址
rlogourl=https://raw.githubusercontent.com/feiyu563/PrometheusAlert/master/doc/alert-center.png
#短信告警级别(等于3就进行短信告警) 告警级别定义 0 信息,1 警告,2 一般严重,3 严重,4 灾难
messagelevel=3
#电话告警级别(等于4就进行语音告警) 告警级别定义 0 信息,1 警告,2 一般严重,3 严重,4 灾难
phonecalllevel=4
#默认拨打号码(页面测试短信和电话功能需要配置此项)
defaultphone=xxxxxxxx
#故障恢复是否启用电话通知0为关闭,1为开启
phonecallresolved=0
#自动告警抑制(自动告警抑制是默认同一个告警源的告警信息只发送告警级别最高的第一条告警信息,其他消息默认屏蔽,这么做的目的是为了减少相同告警来源的消息数量,防止告警炸弹,0为关闭,1为开启)
silent=0
#是否前台输出file or console
logtype=file
#日志文件路径
logpath=logs/prometheusalertcenter.log
#转换Prometheus,graylog告警消息的时区为CST时区(如默认已经是CST时区,请勿开启)
prometheus_cst_time=0
#数据库驱动,支持sqlite3,mysql,如使用mysql,请开启db_host,db_user,db_password,db_name的注释
db_driver=sqlite3
#db_host=127.0.0.1:3306
#db_user=root
#db_password=root
#db_name=prometheusalert

#---------------------↓webhook-----------------------
#是否开启钉钉告警通道,可同时开始多个通道0为关闭,1为开启
open-dingding=1
#默认钉钉机器人地址
ddurl=https://oapi.dingtalk.com/robot/send?access_token=xxxxx
#是否开启 @所有人(0为关闭,1为开启)
dd_isatall=1

#是否开启微信告警通道,可同时开始多个通道0为关闭,1为开启
open-weixin=0
#默认企业微信机器人地址
wxurl=https://qyapi.weixin.qq.com/cgi-bin/webhook/send?key=xxxxx

#是否开启飞书告警通道,可同时开始多个通道0为关闭,1为开启
open-feishu=0
#默认飞书机器人地址
fsurl=https://open.feishu.cn/open-apis/bot/hook/xxxxxxxxx

#---------------------↓腾讯云接口-----------------------
#是否开启腾讯云短信告警通道,可同时开始多个通道0为关闭,1为开启
open-txdx=0
#腾讯云短信接口key
TXY_DX_appkey=xxxxx
#腾讯云短信模版ID 腾讯云短信模版配置可参考 prometheus告警:{1}
TXY_DX_tpl_id=xxxxx
#腾讯云短信sdk app id
TXY_DX_sdkappid=xxxxx
#腾讯云短信签名 根据自己审核通过的签名来填写
TXY_DX_sign=腾讯云

#是否开启腾讯云电话告警通道,可同时开始多个通道0为关闭,1为开启
open-txdh=0
#腾讯云电话接口key
TXY_DH_phonecallappkey=xxxxx
#腾讯云电话模版ID
TXY_DH_phonecalltpl_id=xxxxx
#腾讯云电话sdk app id
TXY_DH_phonecallsdkappid=xxxxx

#---------------------↓华为云接口-----------------------
#是否开启华为云短信告警通道,可同时开始多个通道0为关闭,1为开启
open-hwdx=0
#华为云短信接口key
HWY_DX_APP_Key=xxxxxxxxxxxxxxxxxxxxxx
#华为云短信接口Secret
HWY_DX_APP_Secret=xxxxxxxxxxxxxxxxxxxxxx
#华为云APP接入地址(端口接口地址)
HWY_DX_APP_Url=https://rtcsms.cn-north-1.myhuaweicloud.com:10743
#华为云短信模板ID
HWY_DX_Templateid=xxxxxxxxxxxxxxxxxxxxxx
#华为云签名名称,必须是已审核通过的,与模板类型一致的签名名称,按照自己的实际签名填写
HWY_DX_Signature=华为云
#华为云签名通道号
HWY_DX_Sender=xxxxxxxxxx

#---------------------↓阿里云接口-----------------------
#是否开启阿里云短信告警通道,可同时开始多个通道0为关闭,1为开启
open-alydx=0
#阿里云短信主账号AccessKey的ID
ALY_DX_AccessKeyId=xxxxxxxxxxxxxxxxxxxxxx
#阿里云短信接口密钥
ALY_DX_AccessSecret=xxxxxxxxxxxxxxxxxxxxxx
#阿里云短信签名名称
ALY_DX_SignName=阿里云
#阿里云短信模板ID
ALY_DX_Template=xxxxxxxxxxxxxxxxxxxxxx

#是否开启阿里云电话告警通道,可同时开始多个通道0为关闭,1为开启
open-alydh=0
#阿里云电话主账号AccessKey的ID
ALY_DH_AccessKeyId=xxxxxxxxxxxxxxxxxxxxxx
#阿里云电话接口密钥
ALY_DH_AccessSecret=xxxxxxxxxxxxxxxxxxxxxx
#阿里云电话被叫显号,必须是已购买的号码
ALY_DX_CalledShowNumber=xxxxxxxxx
#阿里云电话文本转语音(TTS)模板ID
ALY_DH_TtsCode=xxxxxxxx

#---------------------↓容联云接口-----------------------
#是否开启容联云电话告警通道,可同时开始多个通道0为关闭,1为开启
RLY_DH_open-rlydh=0
#容联云基础接口地址
RLY_URL=https://app.cloopen.com:8883/2013-12-26/Accounts/
#容联云后台SID
RLY_ACCOUNT_SID=xxxxxxxxxxx
#容联云api-token
RLY_ACCOUNT_TOKEN=xxxxxxxxxx
#容联云app_id
RLY_APP_ID=xxxxxxxxxxxxx

#---------------------↓邮件配置-----------------------
#是否开启邮件
open-email=0
#邮件发件服务器地址
Email_host=smtp.qq.com
#邮件发件服务器端口
Email_port=465
#邮件帐号
[email protected]
#邮件密码
Email_password=xxxxxx
#邮件标题
Email_title=运维告警
#默认发送邮箱
[email protected],[email protected]

#---------------------↓七陌云接口-----------------------
#是否开启七陌短信告警通道,可同时开始多个通道0为关闭,1为开启
open-7moordx=0
#七陌账户ID
7MOOR_ACCOUNT_ID=Nxxx
#七陌账户APISecret
7MOOR_ACCOUNT_APISECRET=xxx
#七陌账户短信模板编号
7MOOR_DX_TEMPLATENUM=n
#注意:七陌短信变量这里只用一个var1,在代码里写死了。
#-----------
#是否开启七陌webcall语音通知告警通道,可同时开始多个通道0为关闭,1为开启
open-7moordh=0
#请在七陌平台添加虚拟服务号、文本节点
#七陌账户webcall的虚拟服务号
7MOOR_WEBCALL_SERVICENO=xxx
# 文本节点里被替换的变量,我配置的是text。如果被替换的变量不是text,请修改此配置
7MOOR_WEBCALL_VOICE_VAR=text

#---------------------↓telegram接口-----------------------
#是否开启telegram告警通道,可同时开始多个通道0为关闭,1为开启
open-tg=0
#tg机器人token
TG_TOKEN=xxxxx
#tg消息模式 个人消息或者频道消息 0为关闭(推送给个人),1为开启(推送给频道)
TG_MODE_CHAN=0
#tg用户ID
TG_USERID=xxxxx
#tg频道name
TG_CHANNAME=xxxxx
#tg api地址, 可以配置为代理地址
#TG_API_PROXY="https://api.telegram.org/bot%s/%s"

#---------------------↓workwechat接口-----------------------
#是否开启workwechat告警通道,可同时开始多个通道0为关闭,1为开启
open-workwechat=0
# 企业ID
WorkWechat_CropID=xxxxx
# 应用ID
WorkWechat_AgentID=xxxx
# 应用secret
WorkWechat_AgentSecret=xxxx
# 接受用户
WorkWechat_ToUser="zhangsan|lisi"
# 接受部门
WorkWechat_ToParty="ops|dev"
# 接受标签
WorkWechat_ToTag=""
# 消息类型, 暂时只支持markdown
# WorkWechat_Msgtype = "markdown"
user.csv: |
2019年4月10日,15888888881,小张,15999999999,备用联系人小陈,15999999998,备用联系人小赵
2019年4月11日,15888888882,小李,15999999999,备用联系人小陈,15999999998,备用联系人小赵
2019年4月12日,15888888883,小王,15999999999,备用联系人小陈,15999999998,备用联系人小赵
2019年4月13日,15888888884,小宋,15999999999,备用联系人小陈,15999999998,备用联系人小赵
kind: ConfigMap
metadata:
name: prometheus-alert-center-conf
namespace: monitoring
---
apiVersion: apps/v1
kind: Deployment
metadata:
labels:
app: prometheus-alert-center
alertname: prometheus-alert-center
name: prometheus-alert-center
# namespace: monitoring
spec:
replicas: 1
selector:
matchLabels:
app: prometheus-alert-center
alertname: prometheus-alert-center
template:
metadata:
labels:
app: prometheus-alert-center
alertname: prometheus-alert-center
spec:
containers:
- image: feiyu563/prometheus-alert
name: prometheus-alert-center
env:
- name: TZ
value: "Asia/Shanghai"
ports:
- containerPort: 8080
name: http
resources:
limits:
cpu: 200m
memory: 200Mi
requests:
cpu: 100m
memory: 100Mi
volumeMounts:
- name: prometheus-alert-center-conf-map
mountPath: /app/conf/app.conf
subPath: app.conf
- name: prometheus-alert-center-conf-map
mountPath: /app/user.csv
subPath: user.csv
volumes:
- name: prometheus-alert-center-conf-map
configMap:
name: prometheus-alert-center-conf
items:
- key: app.conf
path: app.conf
- key: user.csv
path: user.csv
---
apiVersion: v1
kind: Service
metadata:
labels:
alertname: prometheus-alert-center
name: prometheus-alert-center
# namespace: monitoring
annotations:
prometheus.io/scrape: 'true'
prometheus.io/port: '8080'
spec:
ports:
- name: http
port: 8080
targetPort: http
selector:
app: prometheus-alert-center
---
# apiVersion: networking.k8s.io/v1beta1
# kind: Ingress
# metadata:
# annotations:
# kubernetes.io/ingress.class: nginx
# name: prometheus-alert-center
# namespace: monitoring
# spec:
# rules:
# - host: alert-center.local
# http:
# paths:
# - backend:
# serviceName: prometheus-alert-center
# servicePort: 8080
# path: /

文件中的注释很详细,这里需要额外说一下PrometheusAlert 同时支持按照日期发送告警到不同号码,并且已经加入告警失败或者被告警人未接听电话后转联系默认联系人defaultphone 只需新建user.csv文件,并将文件放到程序运行目录下即可自动加载 同时该文件也是电话回调接口所必需文件(如回调接口返回非0状态,则会在此文件中寻找下一号码进行拨打,如开启回调功能,请务必创建该文件) ps:目前grafana/graylog的电话和短信告警依赖于该文件,prometheus电话和短信告警优先从rules的mobile字段读取,如未配置号码,则会从user.csv中读取,如user.csv中也未配置,则会直接发送到defaultphone

关于user.csv中值班时间切换问题,默认每日上午10点进行切换,

1
2
3
4
2019年4月10日,15888888881,小张,15999999999,备用联系人小陈,15999999998,备用联系人小赵
2019年4月11日,15888888882,小李,15999999999,备用联系人小陈,15999999998,备用联系人小赵
2019年4月12日,15888888883,小王,15999999999,备用联系人小陈,15999999998,备用联系人小赵
2019年4月13日,15888888884,小宋,15999999999,备用联系人小陈,15999999998,备用联系人小赵
chaos-mesh 混沌工程(下)

Chaos-mesh 配置

定义混沌实验范围

Chaos-mesh提供了多种选择器,可以用来定义混沌实验的范围,这些选择器spec.selectorchaos对象的字段中定义。

名称空间选择

1
2
3
4
spec: 
selector:
namespaces:
- "app-ns"

标签选择器

标签选择器通过标签过滤混沌实验的目标,定义为字符串键和值的映射。

1
2
3
4
spec: 
selector:
labelSelectors:
"app.kubernetes.io/component": "tikv"

字段选择器

字段选择器通过资源字段过滤实验目标。定义为字符串键和值的映射。

Chaos-mesh 混沌工程(上)

混沌工程简介

2008年Netflix决定把它的业务迁移到aws上,并且Netflix决心探索一种在生产环境验证应用高可用性的一种方法,这就是现在大家所熟知的混沌工程。根据 Netflix 的解释,混沌工程是通过应用一些经验探索的原则,来学习观察系统是如何反应的。这就跟科学家做实验去学习物理定律一样,混沌工程是通过做实验去了解系统。

为什么需要混沌工程。应用混沌工程能提升整个系统的弹性。通过设计并且进行混沌实验,我们可以了解到系统脆弱的一面,在还没出现对用户造成伤害之前,我们就能主动发现这些问题。

混沌工程的发展

image-20201230110254308

2010年 Netflix 内部开发了 AWS 云上随机终止 EC2 实例的混沌实验工具:Chaos Monkey
2011年 Netflix release了其猴子军团工具集:Simian Army
2012年 Netflix 向社区开源由 Java 构建 Simian Army,其中包括 Chaos Monkey V1 版本
2014年 Netflix 开始正式公开招聘 Chaos Engineer
2014年 Netflix 提出了故障注入测试(FIT),利用微服务架构的特性,控制混沌实验的爆炸半径
2015年 Netflix release了 Chaos Kong ,模拟AWS区域(Region)中断的场景
2015年 Netflix 和社区正式提出混沌工程的指导思想 – Principles of Chaos Engineering
2016年 Kolton Andrus(前 Netflix 和 Amazon Chaos Engineer )创立了 Gremlin ,正式将混沌实验工具商用化
2017年 Netflix 开源 Chaos Monkey 由 Golang 重构的 V2 版本,必须集成 CD 工具 Spinnaker(持续发布平台)来使用
2017年 Netflix release了 ChAP (Chaos Automation Platform, 混沌实验自动平台),可视为应用故障注入测试(FIT)的加强版
2017年 由Netflix 前混沌工程师撰写的新书“混沌工程”在网上出版
2017年 Russell Miles 创立了 ChaosIQ 公司,并开源了 chaostoolkit 混沌实验框架

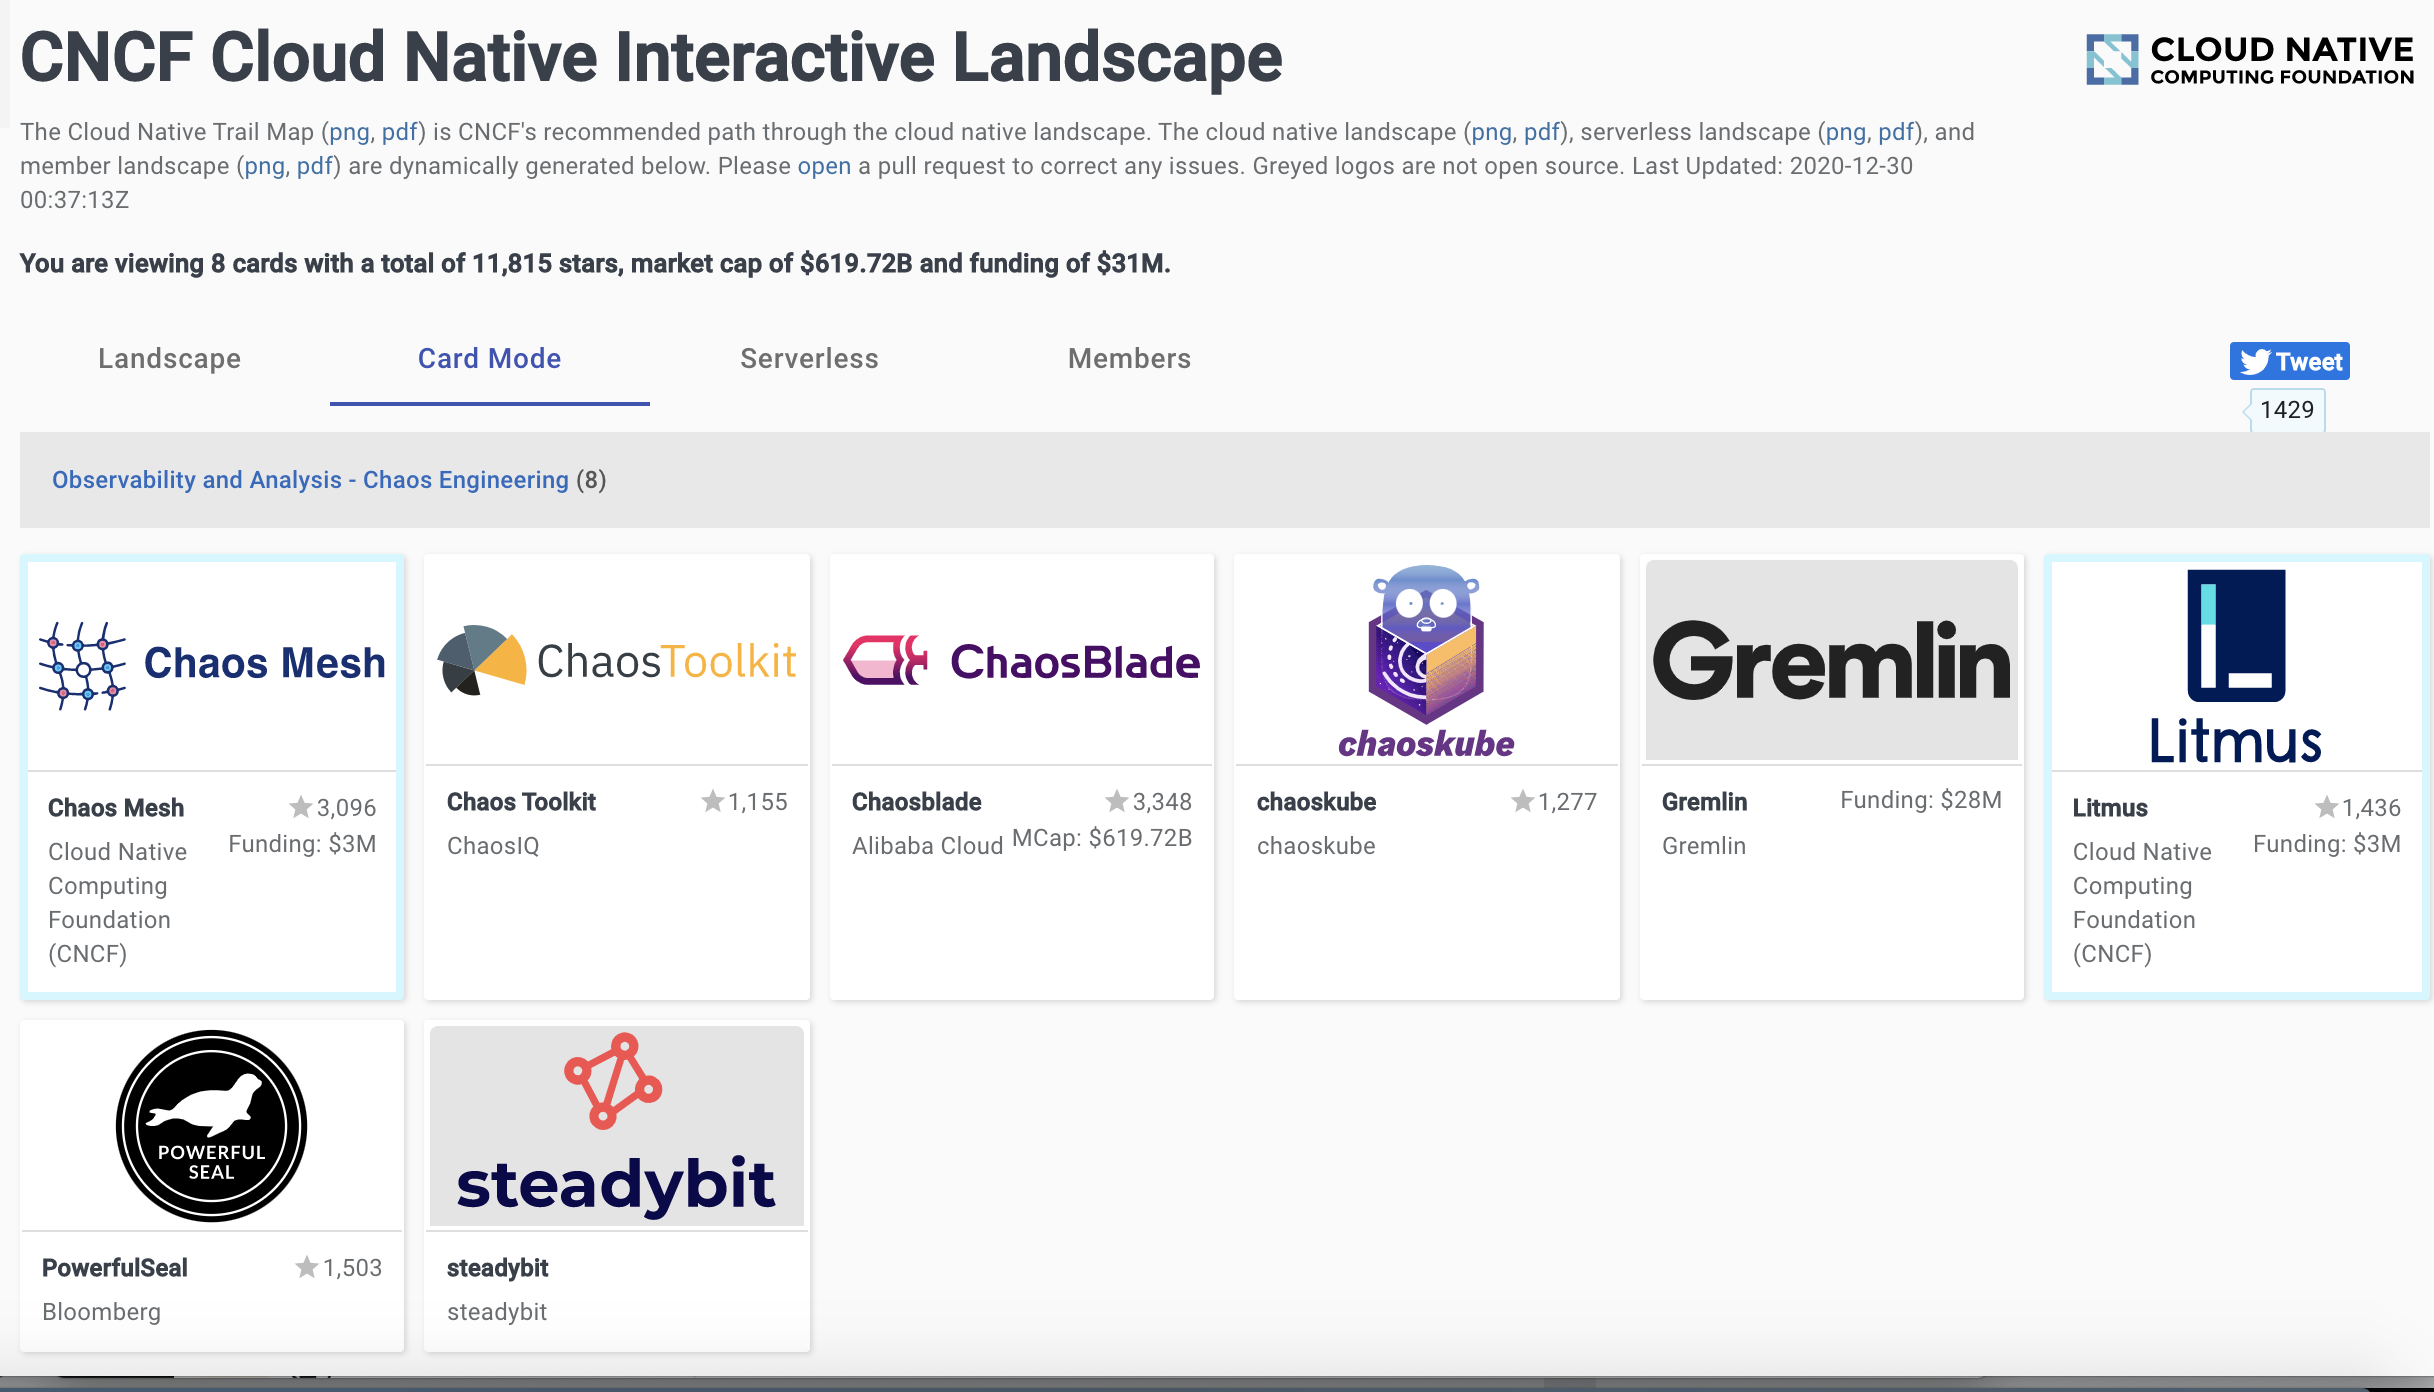
下面这张图是云原生全景图中混沌工程部分,我们可以看到现在混沌工程项目也是已经百花齐放。

image-20201230110652194

Chaos-mesh项目简介

Chaos Mesh®是云原生计算基金会(CNCF)托管的项目。

扫描k8s集群中漏洞

Kubei是一个漏洞扫描和CIS Docker基准测试工具,它能够对kubernetes集群进行准确,即时的风险评估。Kubei扫描Kubernetes集群中正在使用的所有图像,包括应用程序Pod和系统Pod的镜像。它不会扫描整个镜像注册表,也不需要与CI / CD进行初步集成。

它是一种可配置的工具,可以定义扫描范围(目标名称空间),速度和关注的漏洞级别,还提供了图形用户界面。

安装要求:

Kubernetes集群已准备就绪,并且已~/.kube/config为目标集群正确配置了kubeconfig

需要的权限

  1. 在集群范围内读取secret。这是用于获取私有镜像仓库的镜像的拉取凭据。
  2. 列出集群范围内的Pod。
  3. 在集群范围内创建job。创建job将扫描其名称空间中的目标容器

部署

1
2
3
4
5
6
7
8
9
10
11
12
13
14
15
16
17
18
19
20
21
22
23
24
25
26
27
28
29
30
31
32
33
34
35
36
37
38
39
40
41
42
43
44
45
46
47
48
49
50
51
52
53
54
55
56
57
58
59
60
61
62
63
64
65
66
67
68
69
70
71
72
73
74
75
76
77
78
79
80
81
82
83
84
85
86
87
88
89
90
91
92
93
94
95
96
97
98
99
100
101
102
103
104
105
106
107
108
109
110
111
112
113
114
115
116
117
118
119
120
121
122
123
124
125
126
127
128
129
130
131
132
133
134
135
136
137
138
139
140
141
142
143
144
145
146
147
148
149
150
151
152
153
154
155
156
157
158
159
160
161
162
163
164
165
166
167
168
169
170
171
172
173
174
175
176
177
178
179
180
181
182
183
184
185
186
187
188
189
190
191
192
193
194
195
196
197
198
199
200
201
202
203
204
205
206
207
208
209
210
211
212
213
214
215
216
217
218
219
220
221
222
223
224
225
226
227
228
229
230
231
232
233
234
235
236
237
238
239
240
---
apiVersion: v1
kind: Namespace
metadata:
name: kubei
---
apiVersion: v1
kind: ServiceAccount
metadata:
name: kubei
namespace: kubei
---
apiVersion: rbac.authorization.k8s.io/v1
kind: ClusterRole
metadata:
name: kubei
rules:
- apiGroups: [""]
resources: ["secrets"]
verbs: ["get"]
- apiGroups: [""]
resources: ["pods"]
verbs: ["list"]
- apiGroups: ["batch"]
resources: ["jobs"]
verbs: ["create","delete"]
---
apiVersion: rbac.authorization.k8s.io/v1
kind: ClusterRoleBinding
metadata:
name: kubei
subjects:
- kind: ServiceAccount
name: kubei
namespace: kubei
roleRef:
apiGroup: rbac.authorization.k8s.io
kind: ClusterRole
name: kubei
---
apiVersion: v1
kind: Service
metadata:
name: clair
namespace: kubei
labels:
app: clair
spec:
type: ClusterIP
ports:
- port: 6060
protocol: TCP
name: apiserver
- port: 6061
protocol: TCP
name: health
selector:
app: clair
---
apiVersion: apps/v1
kind: Deployment
metadata:
name: clair
namespace: kubei
labels:
app: clair
spec:
replicas: 1
selector:
matchLabels:
app: clair
template:
metadata:
labels:
app: clair
kubeiShouldScan: "false"
spec:
initContainers:
- name: check-db-ready
image: postgres:12-alpine
command: ['sh', '-c', 'until pg_isready -h postgres -p 5432; do echo waiting for database; sleep 2; done;']
containers:
- name: clair
image: gcr.io/portshift-release/clair/clair-local-scan
imagePullPolicy: Always
ports:
- containerPort: 6060
- containerPort: 6061
resources:
limits:
cpu: 2000m
memory: 6G
requests:
cpu: 700m
memory: 3G
# uncomment the following lines in case Kubei is running behind proxy. update PROXY_IP & PROXY_PORT according to your proxy settings
# env:
# - name: HTTPS_PROXY
# value: "{ PROXY_IP }:{ PROXY_PORT }"
# - name: HTTP_PROXY
# value: "{ PROXY_IP }:{ PROXY_PORT }"
# - name: NO_PROXY
# value: "postgres"
---
apiVersion: v1
kind: Service
metadata:
labels:
app: postgres
name: postgres
namespace: kubei
spec:
type: ClusterIP
ports:
- name: db
port: 5432
protocol: TCP
selector:
app: postgres
---
apiVersion: apps/v1
kind: Deployment
metadata:
name: clair-postgres
namespace: kubei
labels:
app: postgres
spec:
replicas: 1
selector:
matchLabels:
app: postgres
template:
metadata:
labels:
app: postgres
kubeiShouldScan: "false"
spec:
containers:
- name: clair-db
image: gcr.io/portshift-release/clair/clair-db
imagePullPolicy: Always
ports:
- containerPort: 5432
resources:
limits:
cpu: 1500m
memory: 1G
requests:
cpu: 500m
memory: 400Mi
---
apiVersion: v1
kind: Service
metadata:
namespace: kubei
name: kubei
labels:
app: kubei
spec:
type: ClusterIP
ports:
- port: 8080
protocol: TCP
name: http-webapp
- port: 8081
protocol: TCP
name: http-klar-result
selector:
app: kubei
---
apiVersion: apps/v1
kind: Deployment
metadata:
name: kubei
namespace: kubei
labels:
app: kubei
spec:
replicas: 1
selector:
matchLabels:
app: kubei
template:
metadata:
labels:
app: kubei
kubeiShouldScan: "false"
spec:
serviceAccountName: kubei
initContainers:
- name: init-clairsvc
image: yauritux/busybox-curl
args:
- /bin/sh
- -c
- >
set -x;
while [ $(curl -sw '%{http_code}' "http://clair.kubei:6060/v1/namespaces" -o /dev/null) -ne 200 ]; do
echo "waiting for clair to be ready";
sleep 15;
done
containers:
- name: kubei
image: gcr.io/development-infra-208909/kubei:1.0.8
imagePullPolicy: Always
env:
- name: "KLAR_IMAGE_NAME"
value: "gcr.io/development-infra-208909/klar:1.0.7"
- name: "DOCKLE_IMAGE_NAME"
value: "gcr.io/development-infra-208909/dockle:1.0.0"
- name: "MAX_PARALLELISM" # max number of scans that will run simultaneously. defaults to 10
value: "10"
- name: "TARGET_NAMESPACE" # empty = scan all namespaces
value: ""
- name: "SEVERITY_THRESHOLD" # minimum level of vulnerability to report. defaults to MEDIUM
value: "MEDIUM"
- name: "IGNORE_NAMESPACES" # a list of namespaces to ignore. defaults no namespace to ignore
value: "istio-system,kube-system"
- name: "DELETE_JOB_POLICY"
value: "Successful"
- name: "SCANNER_SERVICE_ACCOUNT" # Defaults to 'default' service account
value: ""
- name: "REGISTRY_INSECURE" # Allow scanner to access insecure registries (HTTP only). Default is `false`.
value: "false"
# uncomment the following lines in case Kubei is running behind proxy. update PROXY_IP & PROXY_PORT according to your proxy settings
# - name: SCANNER_HTTPS_PROXY
# value: "{ PROXY_IP }:{ PROXY_PORT }"
# - name: SCANNER_HTTP_PROXY
# value: "{ PROXY_IP }:{ PROXY_PORT }"
ports:
- containerPort: 8080
- containerPort: 8081
resources:
limits:
cpu: 100m
memory: 100Mi
requests:
cpu: 10m
memory: 20Mi

这里有部分镜像因为特殊原因无法拉取,这里我已经下载并上传到dockerhub,对应如下,修改即可。

gcr.io/portshift-release/clair/clair-local-scan —>misterli/clair-local-scan:v2.1.4.ubi.2

利用k8s审计日志生成RBAC规则

简介

很多时候我们在k8s上安装服务会遇到各种各样的权限问题,有时候为某个用户或者serviceaccount对象生成一个合适的role会比较头疼,这里推荐一个工具audit2rbac,它可以根据k8s的审计日志,为指定用户或者serviceaccount对象生成它们所需要的role.

audit2rbac下载地址: https://github.com/liggitt/audit2rbac/releases

前提要求

1、集群已经开启审计日志,且日志格式为json格式,开启审计日志可以参考https://kubernetes.io/docs/tasks/debug-application-cluster/audit/#advanced-audit

2、建议日志级别设置为Metadata,还可以减少日志大小

使用

我们这里已经开启了审计日志,这里截取一小段日志内容如下:

1
2
{"kind":"Event","apiVersion":"audit.k8s.io/v1","level":"Metadata","auditID":"571b8d06-aa30-4aec-87cb-7bef2ef88d18","stage":"ResponseComplete","requestURI":"/apis/coordination.k8s.io/v1/namespaces/longhorn-system/leases/external-resizer-driver-longhorn-io","verb":"update","user":{"username":"system:serviceaccount:longhorn-system:longhorn-service-account","uid":"cdb0a05f-170d-4f02-aeec-88af904e68f7","groups":["system:serviceaccounts","system:serviceaccounts:longhorn-system","system:authenticated"]},"sourceIPs":["172.20.166.16"],"userAgent":"csi-resizer/v0.0.0 (linux/amd64) kubernetes/$Format","objectRef":{"resource":"leases","namespace":"longhorn-system","name":"external-resizer-driver-longhorn-io","uid":"81766194-e2e3-4edd-83d7-788a07562b91","apiGroup":"coordination.k8s.io","apiVersion":"v1","resourceVersion":"18772044"},"responseStatus":{"metadata":{},"code":200},"requestReceivedTimestamp":"2021-01-06T03:02:52.709670Z","stageTimestamp":"2021-01-06T03:02:52.710917Z","annotations":{"authorization.k8s.io/decision":"allow","authorization.k8s.io/reason":"RBAC: allowed by ClusterRoleBinding \"longhorn-bind\" of ClusterRole \"longhorn-role\" to ServiceAccount \"longhorn-service-account/longhorn-system\""}}
{"kind":"Event","apiVersion":"audit.k8s.io/v1","level":"Metadata","auditID":"0795fecc-38ea-46d7-a27d-6e73e6a27cd8","stage":"ResponseComplete","requestURI":"/apis/coordination.k8s.io/v1/namespaces/longhorn-system/leases/driver-longhorn-io","verb":"get","user":{"username":"system:serviceaccount:longhorn-system:longhorn-service-account","uid":"cdb0a05f-170d-4f02-aeec-88af904e68f7","groups":["system:serviceaccounts","system:serviceaccounts:longhorn-system","system:authenticated"]},"sourceIPs":["172.20.166.16"],"userAgent":"csi-provisioner/v0.0.0 (linux/amd64) kubernetes/$Format","objectRef":{"resource":"leases","namespace":"longhorn-system","name":"driver-longhorn-io","apiGroup":"coordination.k8s.io","apiVersion":"v1"},"responseStatus":{"metadata":{},"code":200},"requestReceivedTimestamp":"2021-01-06T03:02:52.713255Z","stageTimestamp":"2021-01-06T03:02:52.713894Z","annotations":{"authorization.k8s.io/decision":"allow","authorization.k8s.io/reason":"RBAC: allowed by ClusterRoleBinding \"longhorn-bind\" of ClusterRole \"longhorn-role\" to ServiceAccount \"longhorn-service-account/longhorn-system\""}}

接下来我们使用audit2rbac为serviceaccount:longhorn-system:longhorn-service-account生成rbac role

同步secret和config到指定namespace

简介

Synator可以将Secrets和ConfigMap在我们集群的namespace中同步,实现一步在集群多个namespace创建secrets和configmap,可以用来创建一些集群中多个namespace都需要的secerts和configmap咨询,如镜像的拉取凭证

项目:https://github.com/TheYkk/synator.git

安装

1
2
3
git clone https://github.com/TheYkk/synator.git
cd synctor
kubectl apply -f deploy.yml

安装后可以查看

1
2
3
[root@master-01 sync-cm-secret]# kubectl get pod -l name=synator
NAME READY STATUS RESTARTS AGE
synator-77f47f7dfb-jbrq5 1/1 Running 0 13m

使用

1、添加注解synator/sync=yes到Secret或ConfigMap即可,还可以使用注解synator/include-namespaces='namespace1,namespace2' 设置同步到哪些名称空间,或者使用注解synator/exclude-namespaces='kube-system,kube-node-lease 排除某些名称空间

例如我们创建一个secrets并设置同步到kuboard和monitoring这两个namespace下

kubevela之appfile详解(下)

上一篇我们介绍了appfile中服务的几种类型以及相关参数,这一篇我们介绍一些appfile的traits。在traits中可以配置一些运维策略,包括routes(ingress ), auto-scaling , rollout, metrics.

routes

Route 用于配置对服务的外部访问。

可用属性列表

1
2
3
4
5
6
7
8
9
10
11
name: my-app-name

services:
my-service-name:
...
route:
domain: example.com
issuer: tls
rules:
- path: /testapp
rewriteTarget: /

参数说明:

名称 类型 描述 笔记
domain string 指定此应用程序的URL [默认为(空)]
issuer string 指定是否使用cert-manager创建ssl证书。 [默认为不使用tls]
rules [[] RouteRules](见下表) [可选的]

RouteRules

名称 类型 描述 笔记
path string [默认为(空)]
RewriteTarget string [默认为(空)]

示例:

kubevela之appfile详解(上)

上一篇我们使用vela部署了一个简单的服务,下面我们部署一个完整的服务并学习一下appfile该如何去写

1
2
3
4
5
6
7
8
9
10
11
12
13
14
15
16
17
18
19
20
21
22
23
24
25
26
27
28
29
30
31
32
33
34
35
36
37
38
39
40
41
42
43
44
45
46
47
48
49
50
51
52
53
vela.yaml
name: testapp

services:
test-web-service:
# this image will be used in both build and deploy steps
image: christianhxc/gorandom:1.0

type: webservice

port: 8080
cpu: "0.1"
env:
- name: FOO
value: bar
scaler:
replicas: 1

route:
domain: kubevela.lishuai.fun
rules:
- path: /

metrics:
enabled: true
format: prometheus
path: /metrics
port: 0
scheme: http

autoscale:
min: 1
max: 4
cron:
startAt: "15:40"
duration: "3m"
days: "Monday, Thursday"
replicas: 2
timezone: "Asia/Shanghai"


test-worker:
type: worker
image: oamdev/testapp:v1
cmd: ["node", "server.js"]

test-task:
type: task
image: perl
count: 10
restart: Never
cmd: ["perl", "-Mbignum=bpi", "-wle", "print bpi(2000)"]

部署上面的vela.yaml之后vela根据文件的内容为我们创建了相关的pod,service,job,ingress。

1
2
3
4
5
6
7
8
9
10
11
12
13
14
15
16
17
18
19
20
21
22
23
24
25
26
27
28
29
30
31
32
33
34
35
36
37
38
39
40
41
42
43
44
45
46
47
48
49
50
51
52
53
54
55
56
57
58
59
60
61
62
[root@master-01 testapp]# vela up 
Parsing vela.yaml ...
Loading templates ...

Rendering configs for service (test-task)...

Rendering configs for service (test-web-service)...

Rendering configs for service (test-worker)...
Writing deploy config to (.vela/deploy.yaml)

Applying deploy configs ...
Checking if app has been deployed...
App exists, updating existing deployment...
✅ App has been deployed 🚀🚀🚀
Port forward: vela port-forward testapp
SSH: vela exec testapp
Logging: vela logs testapp
App status: vela status testapp
Service status: vela status testapp --svc test-task
Service status: vela status testapp --svc test-web-service
Service status: vela status testapp --svc test-worker
[root@master-01 testapp]# kubectl get pod,svc,job,ingress
NAME READY STATUS RESTARTS AGE
pod/check-ecs-price-7cdc97b997-j9w9q 1/1 Running 0 11d
pod/test-task-59hqm 1/1 Running 0 17s
pod/test-task-bp8f4 0/1 ContainerCreating 0 17s
pod/test-task-fh7zf 0/1 ContainerCreating 0 17s
pod/test-task-gv44j 0/1 ContainerCreating 0 17s
pod/test-task-lqrds 0/1 ContainerCreating 0 17s
pod/test-task-mn8z9 0/1 ContainerCreating 0 17s
pod/test-task-swzg5 0/1 ContainerCreating 0 17s
pod/test-task-xg2nq 0/1 ContainerCreating 0 17s
pod/test-task-xz5h2 0/1 ContainerCreating 0 17s
pod/test-task-zfjm8 0/1 ContainerCreating 0 17s
pod/test-web-service-5dff6fd5d-gw7bd 1/1 Running 0 17s

NAME TYPE CLUSTER-IP EXTERNAL-IP PORT(S) AGE
service/kubernetes ClusterIP 10.96.0.1 <none> 443/TCP 13d
service/oam-metricapp ClusterIP 10.104.9.200 <none> 4848/TCP 16h
service/oam-test-web-service ClusterIP 10.104.240.83 <none> 4848/TCP 4m56s
service/test-web-service-route-5897fbd549 ClusterIP 10.103.62.97 <none> 8080/TCP 16s
service/traefik-forward-auth ClusterIP 10.96.227.183 <none> 4181/TCP 13d

NAME COMPLETIONS DURATION AGE
job.batch/test-task 0/10 17s 17s

NAME CLASS HOSTS ADDRESS PORTS AGE
ingress.extensions/test-web-service-route-5897fbd549-0 <none> kubevela.lishuai.fun 80 16s
[root@master-01 testapp]# curl kubevela.lishuai.fun/metrics
# HELP go_build_info Build information about the main Go module.
# TYPE go_build_info gauge
go_build_info{checksum="unknown",path="unknown",version="unknown"} 1
# HELP go_gc_duration_seconds A summary of the GC invocation durations.
# TYPE go_gc_duration_seconds summary
go_gc_duration_seconds{quantile="0"} 2.8372e-05
go_gc_duration_seconds{quantile="0.25"} 2.8372e-05
go_gc_duration_seconds{quantile="0.5"} 6.7686e-05
go_gc_duration_seconds{quantile="0.75"} 7.9579e-05
go_gc_duration_seconds{quantile="1"} 7.9579e-05
go_gc_duration_seconds_sum 0.000175637

接下来我们看一下appfile文件的结构,Appfile所有可用部分的列表如下:

1
2
3
4
5
6
7
8
9
10
11
12
13
14
15
16
17
18
19
20
21
22
23
24
25
26
27
28
29
30
31
name: _app-name_   #定义这个app的名称

services:
_service-name_: #_service
# If `build` section exists, this field will be used as the name to build image. Otherwise, KubeVela will try to pull the image with given name directly.
image: oamdev/testapp:v1

build:
docker:
file: _Dockerfile_path_ # relative path is supported, e.g. "./Dockerfile"
context: _build_context_path_ # relative path is supported, e.g. "."

push:
local: kind # optionally push to local KinD cluster instead of remote registry

type: webservice (default) | worker | task

# detailed configurations of workload
... properties of the specified workload ...

_trait_1_:
# properties of trait 1

_trait_2_:
# properties of trait 2

... more traits and their properties ...

_another_service_name_: # more services can be defined
...

appfile文件主要分为两个部分

描述
name 定义了我们要定义的app的名称
services 定义了我们要创建的application的具体,services段下可以定义多个服务。

Workload type

services可以配置多个服务,每个服务根据workload type不同会被创建为不同的k8s中的资源对象,vela暂时具有以下三种workload type

kubevela小试牛刀(1)

什么是kubevela

KubeVela 是一个简单易用且高度可扩展的应用管理平台与核心引擎。KubeVela 是基于 Kubernetes 与 Open Application Model(OAM) 技术构建的。

OAM 全称是 Open Application Model,从名称上来看它所定义的就是一种模型,同时也实现了基于 OAM 的我认为这种模型旨在定义了云原生应用的标准。

  • 开放(Open):支持异构的平台、容器运行时、调度系统、云供应商、硬件配置等,总之与底层无关
  • 应用(Application):云原生应用
  • 模型(Model):定义标准,以使其与底层平台无关

在 OAM 中,一个应用程序包含三个核心理念。

  • 第一个核心理念是组成应用程序的组件(Component),它可能包含微服务集合、数据库和云负载均衡器;
  • 第二个核心理念是描述应用程序运维特征(Trait)的集合,例如,弹性伸缩和 Ingress 等功能。它们对应用程序的运行至关重要,但在不同环境中其实现方式各不相同;
  • 最后,为了将这些描述转化为具体的应用程序,运维人员使用应用配置(Application Configuration)来组合组件和相应的特征,以构建应部署的应用程序的具体实例

对于开发人员来说,KubeVela本身是一个易于使用的工具,能够以最小的工作量描述应用程序并将其发布到Kubernetes。只需管理一个以应用程序为中心的工作流程即可轻松地与任何CI / CD管道集成,无需管理少量的Kubernetes YAML文件,只需一个简单的docker -compose样式的Appfile

对于平台开发人员来说,KubeVela是一个框架,使他们能够轻松创建面向开发人员的高度可扩展的平台。详细地说,KubeVela通过执行以下操作减轻了构建此类平台的麻烦:

  • 以应用为中心。在Appfile的后面,KubeVela实施了一个应用程序概念,因为它的主要API和ALL KubeVela的功能仅满足应用程序的需求。这是通过采用开放应用程序模型作为KubeVela的核心API来实现的。
  • 本地扩展。KubeVela中的应用程序由各种可插拔工作负载类型和操作功能(即特征)组成。Kubernetes生态系统的功能可以随时通过Kubernetes CRD注册机制作为新的工作负载类型或特征添加到KubeVela中。
  • 简单但可扩展的抽象机制。KubeVela的主要用户界面(即Appfile和CLI)使用基于CUELang的抽象引擎构建,该引擎将面向用户的模式转换为下划线的Kubernetes资源。KubeVela提供了一组内置的抽象对象,平台构建者可以随时随意对其进行修改。抽象更改将在运行时生效,无需重新编译或重新部署KubeVela。

架构

avatar
misterli
大风起兮云飞扬
FRIENDS
baidu google