misterli's Blog.

Chaos-mesh 混沌工程(上)

字数统计: 3.1k阅读时长: 13 min
2021/01/21

混沌工程简介

2008年Netflix决定把它的业务迁移到aws上,并且Netflix决心探索一种在生产环境验证应用高可用性的一种方法,这就是现在大家所熟知的混沌工程。根据 Netflix 的解释,混沌工程是通过应用一些经验探索的原则,来学习观察系统是如何反应的。这就跟科学家做实验去学习物理定律一样,混沌工程是通过做实验去了解系统。

为什么需要混沌工程。应用混沌工程能提升整个系统的弹性。通过设计并且进行混沌实验,我们可以了解到系统脆弱的一面,在还没出现对用户造成伤害之前,我们就能主动发现这些问题。

混沌工程的发展

image-20201230110254308

2010年 Netflix 内部开发了 AWS 云上随机终止 EC2 实例的混沌实验工具:Chaos Monkey
2011年 Netflix release了其猴子军团工具集:Simian Army
2012年 Netflix 向社区开源由 Java 构建 Simian Army,其中包括 Chaos Monkey V1 版本
2014年 Netflix 开始正式公开招聘 Chaos Engineer
2014年 Netflix 提出了故障注入测试(FIT),利用微服务架构的特性,控制混沌实验的爆炸半径
2015年 Netflix release了 Chaos Kong ,模拟AWS区域(Region)中断的场景
2015年 Netflix 和社区正式提出混沌工程的指导思想 – Principles of Chaos Engineering
2016年 Kolton Andrus(前 Netflix 和 Amazon Chaos Engineer )创立了 Gremlin ,正式将混沌实验工具商用化
2017年 Netflix 开源 Chaos Monkey 由 Golang 重构的 V2 版本,必须集成 CD 工具 Spinnaker(持续发布平台)来使用
2017年 Netflix release了 ChAP (Chaos Automation Platform, 混沌实验自动平台),可视为应用故障注入测试(FIT)的加强版
2017年 由Netflix 前混沌工程师撰写的新书“混沌工程”在网上出版
2017年 Russell Miles 创立了 ChaosIQ 公司,并开源了 chaostoolkit 混沌实验框架

下面这张图是云原生全景图中混沌工程部分,我们可以看到现在混沌工程项目也是已经百花齐放。

image-20201230110652194

Chaos-mesh项目简介

Chaos Mesh®是云原生计算基金会(CNCF)托管的项目。

Chaos Mesh 是一个云原生混沌工程平台,提供了在 Kubernetes 平台上进行混沌测试的能力。

上面的云原生全景图也看到了别的一些混沌工程项目,那么我们为什么选择chaos-mesh呢,其实chaos-mesh有下面几点优势

1、基于 K8s。只要你的系统能跑在 K8s 上面,那么就可以无缝的集成 Chaos Mesh,而且不用修改任何业务代码,真正是被测系统无感知。

2、多种多样的故障注入。Chaos Mesh 能全方位的帮你对网络,磁盘,文件系统,操作系统等进行故障注入。我们后面也会提供对 K8s,或者云服务自身进行 chaos 的能力。

3、易于使用。你无需关注 Chaos Mesh 的底层实现细节,只需用 YAML 配置好混沌试验,就可以实施,后面所有的实验是全自动化的。我们也提供了 Dashboard 能让你在网页上就轻松的进行试验。

4、可观测性。Chaos Mesh 的 Dashboard 能很方便的让你观测系统,知道什么时候进行了什么试验,知道你自己的系统当前的运行情况,当然,这里需要一点配置,你需要告诉 Chaos Mesh 如何去获取你系统的稳态指标,譬如你的系统使用 Prometheus,那么就可以告诉 Chaos Mesh 如何去 Prometheus 查询相关的监控指标。

5、强大的开源社区支持。Chaos Mesh 的社区成长的非常迅速,我们非常高兴的看到大部分的功能已经由社区支持,并且也有很多用户。你无需担心遇到问题不知道如何解决,当然,你可能要担心下 Chaos Mesh 做实验的时候把你的数据给完全干掉,所以做实验的时候一定要控制好实验半径,这个也是混沌工程的一条原则。

Chaos-mesh架构

Chaos Mesh 是一个通用的混沌工程解决方案,它的特点是对Kubernetes 上的复杂系统进行全方位的故障注入方法,涵盖了 Pod、网络、文件系统甚至内核的故障。Chaos Mesh 主要包括下面两个组件:

  • Chaos Operator:混沌编排的核心组件。

    Controller-manager:用于计划和管理CRD对象的生命周期

    Chaos-daemon:作为守护程序运行,并通过网络,Cgroup等对特定节点具有特权系统权限

  • Chaos Dashboard:用于管理、设计、监控混沌实验的 Web UI。

Chaos Mesh 使用 CRD 来定义混沌对象。Chaos Mesh 的整体架构非常简单,组件部署在 Kubernetes 之上,我们可以使用 YAML 文件或者使用 Chaos mesh Dashboard 上的 Form 来指定场景。其中会有一个 Chaos Daemon,以 Daemonset 的形式运行,对特定节点的网络、Cgroup 等具有系统权限。

乱网

目前实现的 CRD 对象支持6种类型的故障注入,分别是 PodChaos、NetworkChaos、IOChaos、TimeChaos、StressChaos 和 KernelChaos,对应的主要动作如下所示:

  • pod-kill:模拟 Kubernetes Pod 被 kill。
  • pod-failure:模拟 Kubernetes Pod 持续不可用,可以用来模拟节点宕机不可用场景。
  • network-delay:模拟网络延迟。
  • network-loss:模拟网络丢包。
  • network-duplication: 模拟网络包重复。
  • network-corrupt: 模拟网络包损坏。
  • network-partition:模拟网络分区。
  • I/O delay : 模拟文件系统 I/O 延迟。
  • I/O errno:模拟文件系统 I/O 错误 。

Chaos-mesh工作流程

image-20201230111159985

1、用户使用YAML文件或Kubernetes客户端,创建或更新混沌实验对象到Kubernetes API服务器。
2、Chaos Mesh使用API服务器来监视混沌对象,并通过创建,更新或删除事件来管理混沌实验的生命周期。控制器管理器,chaos-daemon和sidecar容器一起工作以注入错误。
3、当admission-webhooks收到Pod创建请求时,将动态更新要创建的Pod对象。例如,将其注入边车容器和Pod中。

安装

脚本安装

1
curl -sSL https://mirrors.chaos-mesh.org/v1.0.3/install.sh | bash

上面的命令会安装所有的 CRD、ServiceAccount 和所有组件

1
2
3
4
5
6
7
8
9
10
11
12
13
14
15
16
17
18
19
20
21
22
23
24
25
26
27
28
29
30
31
32
33
34
35
36
37
38
39
40
41
[root@master-01 chaos-mesh]# bash install.sh 
Install Chaos Mesh chaos-mesh
customresourcedefinition.apiextensions.k8s.io/iochaos.chaos-mesh.org created
customresourcedefinition.apiextensions.k8s.io/kernelchaos.chaos-mesh.org created
customresourcedefinition.apiextensions.k8s.io/networkchaos.chaos-mesh.org created
customresourcedefinition.apiextensions.k8s.io/podchaos.chaos-mesh.org created
customresourcedefinition.apiextensions.k8s.io/podiochaos.chaos-mesh.org created
customresourcedefinition.apiextensions.k8s.io/podnetworkchaos.chaos-mesh.org created
customresourcedefinition.apiextensions.k8s.io/stresschaos.chaos-mesh.org created
customresourcedefinition.apiextensions.k8s.io/timechaos.chaos-mesh.org created
namespace/chaos-testing created
serviceaccount/chaos-controller-manager created
secret/chaos-mesh-webhook-certs created
clusterrole.rbac.authorization.k8s.io/chaos-mesh:chaos-controller-manager-target-namespace created
clusterrole.rbac.authorization.k8s.io/chaos-mesh:chaos-controller-manager-cluster-level created
clusterrolebinding.rbac.authorization.k8s.io/chaos-mesh:chaos-controller-manager-cluster-level created
clusterrolebinding.rbac.authorization.k8s.io/chaos-mesh:chaos-controller-manager-target-namespace created
role.rbac.authorization.k8s.io/chaos-mesh:chaos-controller-manager-control-plane created
rolebinding.rbac.authorization.k8s.io/chaos-mesh:chaos-controller-manager-control-plane created
service/chaos-dashboard created
service/chaos-mesh-controller-manager created
daemonset.apps/chaos-daemon created
deployment.apps/chaos-dashboard created
deployment.apps/chaos-controller-manager created
mutatingwebhookconfiguration.admissionregistration.k8s.io/chaos-mesh-mutation created
validatingwebhookconfiguration.admissionregistration.k8s.io/chaos-mesh-validation created
Waiting for pod running
chaos-controller-manager-86c96f985f-2dc5m 0/1 ContainerCreating 0 11s
Waiting for pod running
Chaos Mesh chaos-mesh is installed successfully
[root@master-01 chaos-mesh]# kubectl get pod -n chaos-testing
NAME READY STATUS RESTARTS AGE
chaos-controller-manager-86c96f985f-2dc5m 1/1 Running 0 113s
chaos-daemon-4j2rx 1/1 Running 0 113s
chaos-dashboard-5d8dff7df9-zmfs9 1/1 Running 0 113s
[root@master-01 chaos-mesh]# kubectl get svc -n chaos-testing
NAME TYPE CLUSTER-IP EXTERNAL-IP PORT(S) AGE
chaos-dashboard NodePort 10.101.249.22 <none> 2333:31679/TCP 3m17s
chaos-mesh-controller-manager ClusterIP 10.109.203.98 <none> 10081/TCP,10080/TCP,443/TCP 3m16s

访问dashboard

Chaos-mesh 提供了一个dashboard供我们访问,默认dashboard是没有登陆认证,这里我通过traefik的traefik-forward-auth做了登录限制

1
2
3
4
5
6
7
8
9
10
11
12
13
14
15
16
17
18
19
20
21
22
23
24
25
26
27
28
29
30
31
32
33
34
35
36
37
38
39
40
41
42
apiVersion: traefik.containo.us/v1alpha1
kind: IngressRoute
metadata:
name: chaos-mesh
annotations:
prometheus.io/http-probe: "true"
namespace: chaos-testing
spec:
entryPoints:
- web
routes:
- match: Host(`chaos-mesh.lishuai.fun`)
kind: Rule
services:
- name: chaos-dashboard
port: 2333
middlewares: # 使用http重定向搭配https的中间件
- name: redirect-https
namespace: default
---
apiVersion: traefik.containo.us/v1alpha1
kind: IngressRoute
metadata:
annotations:
prometheus.io/http-probe: "true"
name: chaos-mesh-tls
namespace: chaos-testing
spec:
entryPoints:
- websecure
routes:
- match: Host(`chaos-mesh.lishuai.fun`)
kind: Rule
services:
- name: chaos-dashboard
port: 2333
middlewares:
- name: traefik-forward-auth
namespace: kube-system
tls:
certResolver: myresolver

image-20210121135738911

如果页面不是中文设置里可以更改语言为中文

image-20201026173618247

卸载

1
curl -sSL https://mirrors.chaos-mesh.org/v1.0.1/install.sh | bash -s -- --template | kubectl delete -f -

helm安装

添加chaos-mesh的helm仓库

1
helm repo add chaos-mesh https://charts.chaos-mesh.org

添加成功后我们可以使用如下命令进行搜索chart

1
2
3
[root@master-01 chaos-mesh]# helm search repo chaos-mesh
NAME CHART VERSION APP VERSION DESCRIPTION
chaos-mesh/chaos-mesh v0.4.0 v1.1.0 Chaos Mesh® is a cloud-native Chaos Engineerin...

在使用helm安装前我们还需要创建相关自定义资源

1
curl -sSL https://mirrors.chaos-mesh.org/v1.1.0/crd.yaml | kubectl apply -f -

如果k8s版本小于1.15还需要添加参数--validate=false

1
curl -sSL https://mirrors.chaos-mesh.org/v1.1.0/crd.yaml | kubectl apply --validate=false -f -

下面开始正式安装

1
2
3
4
5
6
kubectl create ns chaos-testing
#默认dashboard 未开启,需要安装时添加--set dashboard.create=true 开启dashboard
#安全模式默认开启,安全模式开启时需要设置serviceaccount并为其配置规则,然后获取token进行登录,这里把安全模式禁用 --set dashboard.securityMode=false
#默认未部署dns服务,进行dns 实验需要开启 --set dnsServer.create=true
helm install chaos-mesh chaos-mesh/chaos-mesh --namespace=chaos-testing --set dashboard.create=true --set dashboard.securityMode=false --set dnsServer.create=true

安装后我们可以查看部署的pod

1
2
3
4
5
6
[root@master-01 dns]# kubectl get pod -n chaos-testing 
NAME READY STATUS RESTARTS AGE
chaos-controller-manager-6c4c5b56d4-czbhb 1/1 Running 0 45m
chaos-daemon-m7cg6 1/1 Running 0 47m
chaos-dashboard-6f4c9d8dfc-tptp4 1/1 Running 0 45m
chaos-dns-server-849c69bc7d-4tsqg 1/1 Running 0 47m

简单测试

模拟pod故障

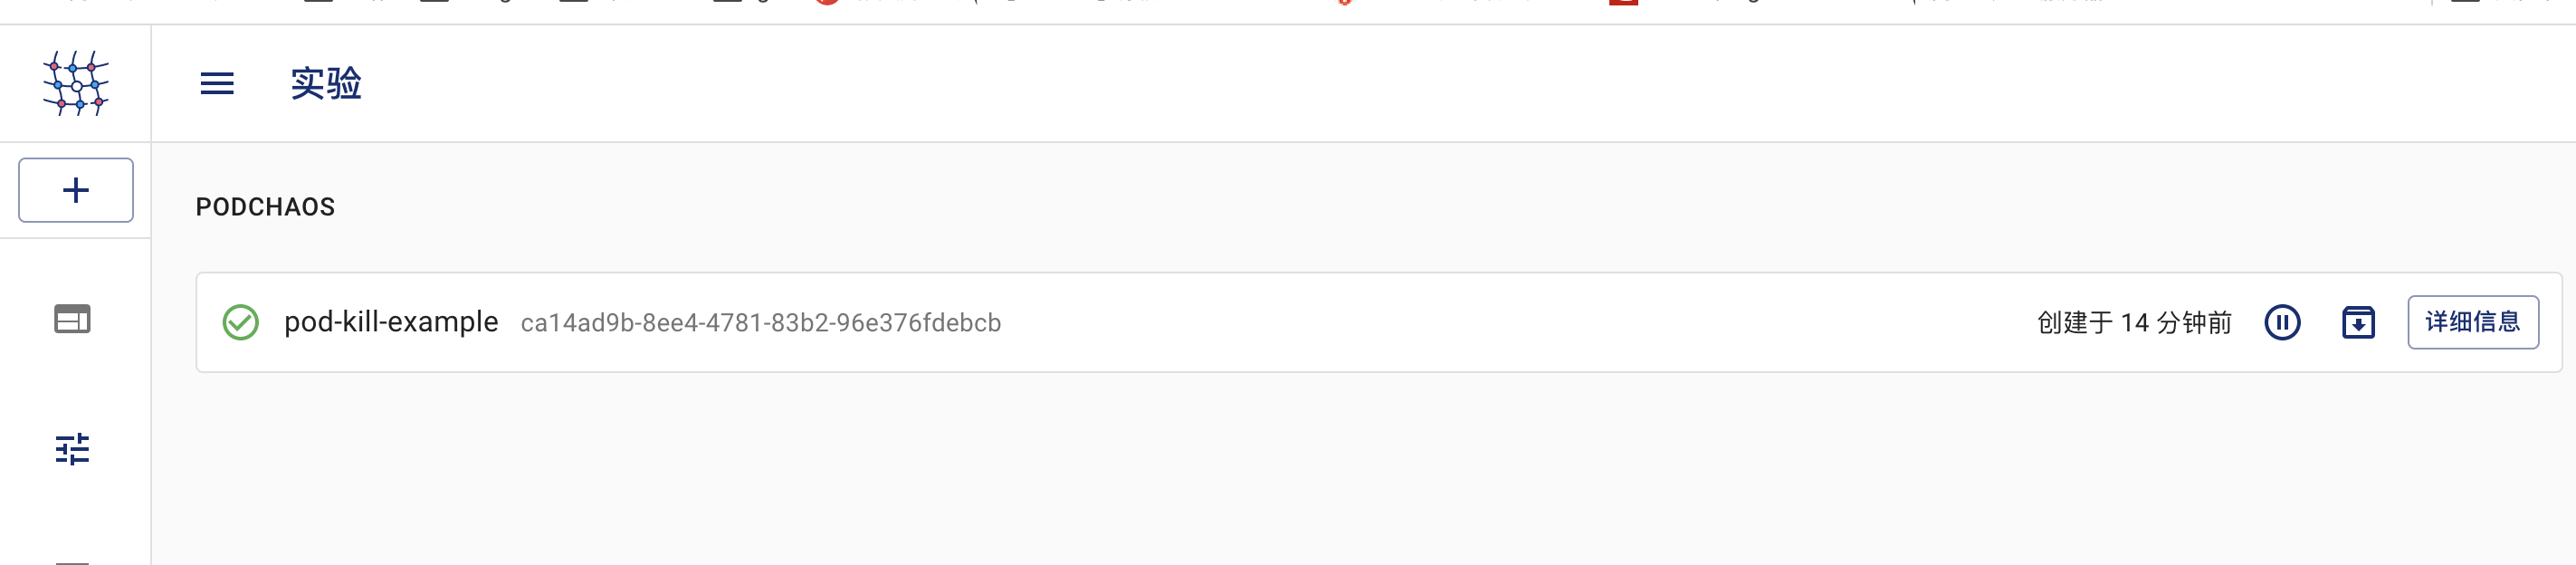
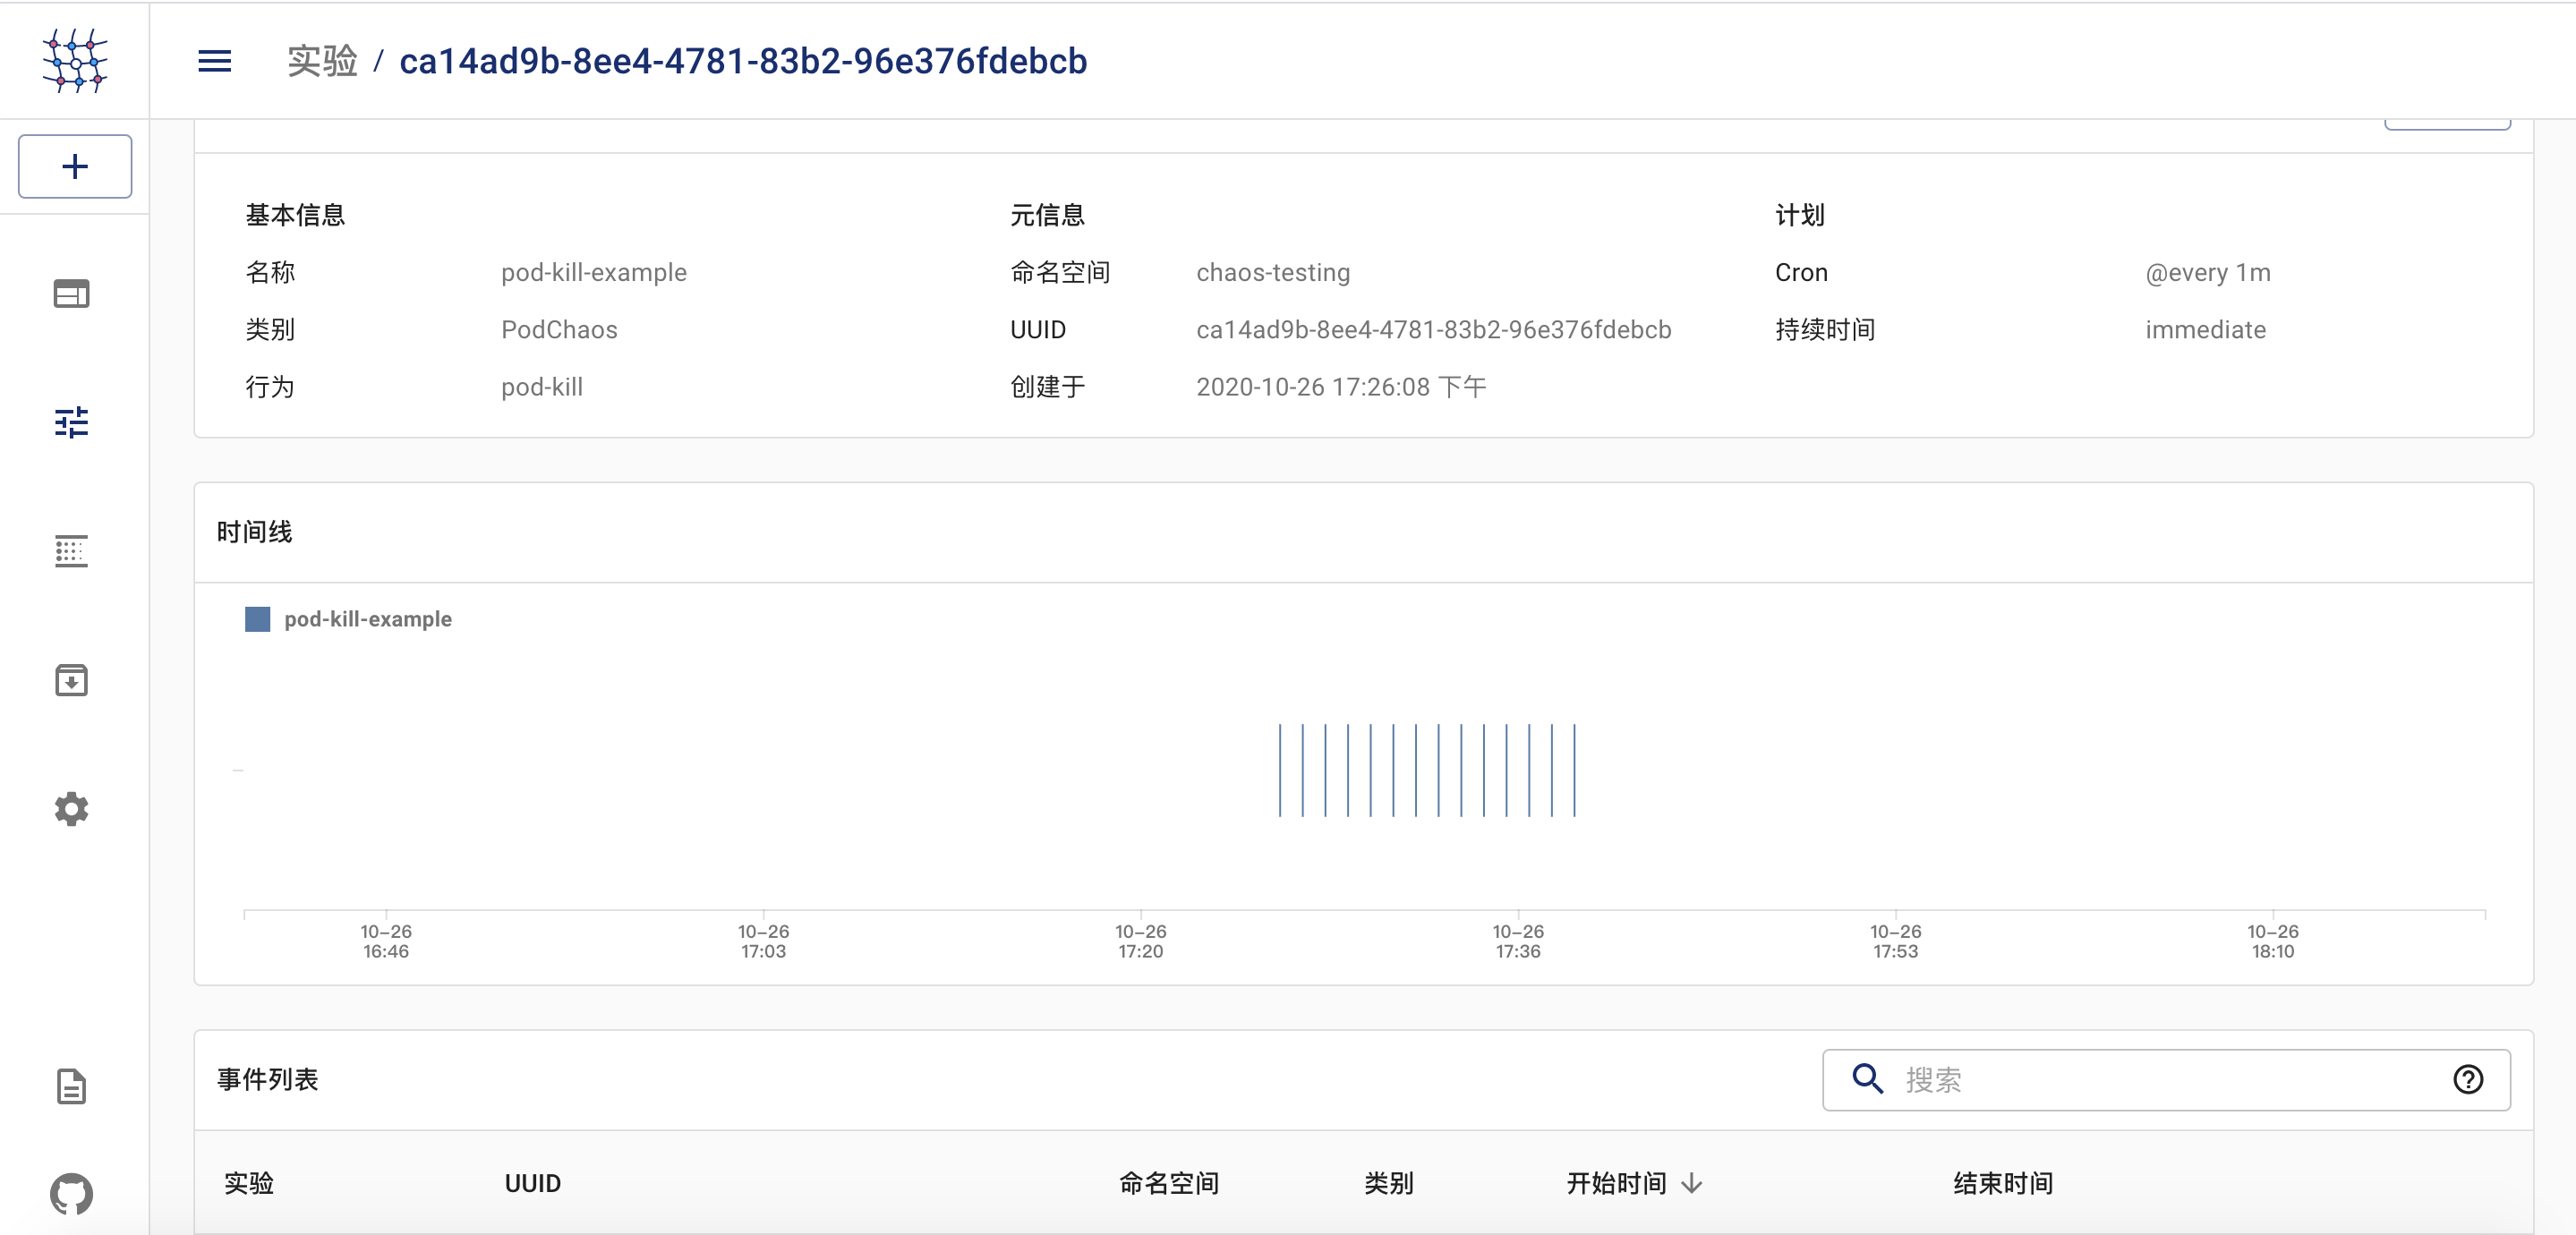
这里我们定义一个测试场景,在这个场景中,我们将为一个命名空间中的 Pod 配置 Chaos,它将被安排每1分钟杀死一个 Pod。本例中 App 没有标签选择器,所以在多副本部署的情况下,它可以杀死任何 Pod。我们可以在配置中拥有不同的作用域。

首先让我们克隆我们的示例仓库来获得 YAML 资源清单文件。

1
2
3
4
5
6
git clone https://github.com/ronakbanka/chaos-mesh-examples.git
cd chaos-mesh-examples/pod-chaos
[root@master-01 pod-chaos]# kubectl apply -f pod-namespace-selector.yml
namespace/appns created
deployment.apps/nginx created
podchaos.chaos-mesh.org/pod-kill-example created

在dashboard上woken也可以看到

image-20201026174025866

image-20201026174015250

我们用kubectl查看如下

1
2
3
4
5
6
7
8
9
10
11
12
13
14
15
16
17
18
19
[root@master-01 pod-chaos]# kubectl -n appns  get pod -w 
NAME READY STATUS RESTARTS AGE
nginx-f89759699-69bxq 1/1 Running 0 49s
nginx-f89759699-88mkw 1/1 Running 0 49s
nginx-f89759699-d6bcj 1/1 Running 0 49s
nginx-f89759699-88mkw 1/1 Terminating 0 60s
nginx-f89759699-krkg7 0/1 Pending 0 0s
nginx-f89759699-krkg7 0/1 ContainerCreating 0 0s
nginx-f89759699-krkg7 1/1 Running 0 39s
nginx-f89759699-krkg7 1/1 Terminating 0 60s
nginx-f89759699-v9rb4 0/1 Pending 0 0s
nginx-f89759699-v9rb4 0/1 ContainerCreating 0 0s

模拟网络故障

1
2
3
4
5
6
7
8
9
10
11
12
13
14
15
16
17
18
19
20
https://github.com/chaos-mesh/web-show.git
[root@master-01 chaos-mesh]# git clone https://github.com/chaos-mesh/web-show.git
正克隆到 'web-show'...
remote: Enumerating objects: 176, done.
remote: Counting objects: 100% (176/176), done.
remote: Compressing objects: 100% (118/118), done.
接收对象中: 100% (176/176), 405.05 KiB | 29.00 KiB/s, done.
remote: Total 176 (delta 68), reused 151 (delta 47), pack-reused 0
处理 delta 中: 100% (68/68), done.
[root@master-01 chaos-mesh]# cd web-show/
[root@master-01 web-show]# ls
chaos deploy deploy.sh Dockerfile go.mod go.sum LICENSE main.go Makefile pkg README.md server web
[root@master-01 web-show]# cd deploy/
[root@master-01 deploy]# ls
deployment.yaml service.yaml
[root@master-01 deploy]# ls ../chaos/
network-delay.yaml
[root@master-01 deploy]# kubectl apply -f ./
deployment.apps/web-show created
service/web-show created

然后编辑network-delay.yaml修改如下并apply

1
2
3
4
5
6
7
8
9
10
11
12
13
14
15
16
17
apiVersion: chaos-mesh.org/v1alpha1
kind: NetworkChaos
metadata:
name: web-show-network-delay
spec:
action: delay # the specific chaos action to inject
mode: one # the mode to run chaos action; supported modes are one/all/fixed/fixed-percent/random-max-percent
selector: # pods where to inject chaos actions
namespaces:
- default
labelSelectors:
"app": "web-show" # the label of the pod for chaos injection
delay:
latency: "10ms"
duration: "30s" # duration for the injected chaos experiment
scheduler: # scheduler rules for the running time of the chaos experiments about pods.
cron: "@every 60s"

我们访问这个web-show服务如下

image-20201026175046190

常用操作

暂停实验

1
kubectl annotate networkchaos web-show-network-delay experiment.chaos-mesh.org/pause=true

恢复实验

1
kubectl annotate networkchaos web-show-network-delay experiment.chaos-mesh.org/pause-

删除实验

1
kubectl delete -f network-delay.yaml

CATALOG
  1. 1. 混沌工程简介
    1. 1.1. 混沌工程的发展
  2. 2. Chaos-mesh项目简介
    1. 2.1. Chaos-mesh架构
    2. 2.2. Chaos-mesh工作流程
  3. 3. 安装
    1. 3.1. 脚本安装
    2. 3.2. 卸载
    3. 3.3. helm安装
  4. 4. 简单测试
    1. 4.1. 模拟pod故障
    2. 4.2. 模拟网络故障
      1. 4.2.1. 常用操作