misterli's Blog.

监控minio的多种姿势

字数统计: 3.9k阅读时长: 19 min
2021/09/06

上一篇文章我们介绍了如何使用控制台和kubectl minio插件来部署minio租户,这里我们介绍一下使用配置文件去部署minio租户以及如何监控minio

使用配置文件部署minio租户

在这里我们先看一下使用控制台和kubectl minio插件来部署minio租户存在哪些问题:

  • Kubectl minio插件部署无法去定制安装的minioz租户的一些高级功能
  • 控制台部署繁琐,且不符合基础设施即代码或者gitops理念,如果出现问题不方便我们去快速重建一个同样的minio。

使用配置文件去创建我们就可以避免这些问题,我们可以快速的用同一个配置文件在多个namespace或者多个集群中创建同样的minio租户。当然 kubectl minio 插件和控制台实际上也是会

下面是一个配置文件的内容,我们首先创建了一个secret 保存了租户的凭据,然后再租户文件中使用这个secret。

注意:每个租户都可以单独开启控制台(默认开启)并对外暴露,我们使用operator console 中访问租户的console 无需再登陆,但是我们如果单独使用nodeport或者ingress 暴露租户的console 就需要使用这里的secret中配置的accesskey和secretkey 登陆。

1
2
3
4
5
6
7
8
9
10
11
12
13
14
15
16
17
18
19
20
21
22
23
24
25
26
27
28
29
30
31
32
33
34
35
36
37
38
39
40
41
42
43
44
45
46
47
48
49
50
51
52
53
54
55
56
57
58
59
60
61
62
63
64
65
66
67
68
69
70
71
72
73
74
75
76
77
78
79
80
81
82
83
84
85
86
87
88
89
90
91
92
93
94
95
96
97
98
99
## Secret to be used as MinIO Root Credentials
apiVersion: v1
kind: Secret
metadata:
name: minio-creds-secret
type: Opaque
data:
## Access Key for MinIO Tenant, base64 encoded (echo -n 'minio' | base64)
accesskey: bWluaW8=
## Secret Key for MinIO Tenant, base64 encoded (echo -n 'minio123' | base64)
secretkey: bWluaW8xMjM=
---
## MinIO Tenant Definition
apiVersion: minio.min.io/v2
kind: Tenant
metadata:
name: minio-demo
## Optionally pass labels to be applied to the statefulset pods
labels:
app: minio
## Annotations for MinIO Tenant Pods
annotations:
prometheus.io/path: /minio/v2/metrics/cluster
prometheus.io/port: "9000"
prometheus.io/scrape: "true"

## If a scheduler is specified here, Tenant pods will be dispatched by specified scheduler.
## If not specified, the Tenant pods will be dispatched by default scheduler.
# scheduler:
# name: my-custom-scheduler

spec:
## Registry location and Tag to download MinIO Server image
image: minio/minio:RELEASE.2021-08-25T00-41-18Z
imagePullPolicy: IfNotPresent

## Secret with credentials to be used by MinIO Tenant.
## Refers to the secret object created above.
credsSecret:
name: minio-creds-secret

## Specification for MinIO Pool(s) in this Tenant.
pools:
## Servers specifies the number of MinIO Tenant Pods / Servers in this pool.
## For standalone mode, supply 1. For distributed mode, supply 4 or more.
## Note that the operator does not support upgrading from standalone to distributed mode.
- servers: 1

## volumesPerServer specifies the number of volumes attached per MinIO Tenant Pod / Server.
volumesPerServer: 4

## This VolumeClaimTemplate is used across all the volumes provisioned for MinIO Tenant in this Pool.
volumeClaimTemplate:
metadata:
name: data
spec:
storageClassName: longhorn
accessModes:
- ReadWriteOnce
resources:
requests:
storage: 1Gi


## Mount path where PV will be mounted inside container(s).
mountPath: /export
## Sub path inside Mount path where MinIO stores data.
# subPath: /data

## Use this field to provide a list of Secrets with external certificates. This can be used to to configure
## TLS for MinIO Tenant pods. Create secrets as explained here:
## https://github.com/minio/minio/tree/master/docs/tls/kubernetes#2-create-kubernetes-secret
# externalCertSecret:
# - name: tls-ssl-minio
# type: kubernetes.io/tls

## Enable automatic Kubernetes based certificate generation and signing as explained in
## https://kubernetes.io/docs/tasks/tls/managing-tls-in-a-cluster
requestAutoCert: false

## Enable S3 specific features such as Bucket DNS which would allow `buckets` to be
## accessible as DNS entries of form `<bucketname>.minio.default.svc.cluster.local`
s3:
## This feature is turned off by default
bucketDNS: false

## This field is used only when "requestAutoCert" is set to true. Use this field to set CommonName
## for the auto-generated certificate. Internal DNS name for the pod will be used if CommonName is
## not provided. DNS name format is *.minio.default.svc.cluster.local
certConfig:
commonName: ""
organizationName: []
dnsNames: []

## PodManagement policy for MinIO Tenant Pods. Can be "OrderedReady" or "Parallel"
## Refer https://kubernetes.io/docs/tutorials/stateful-application/basic-stateful-set/#pod-management-policy
## for details.
podManagementPolicy: Parallel

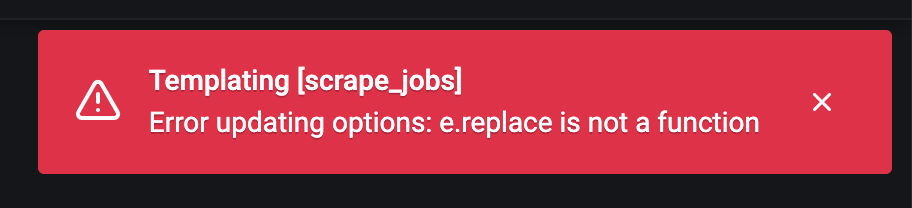
我们就使用这个文件创建一个minio租户

1
2
3
4
5
6
7
8
9
10
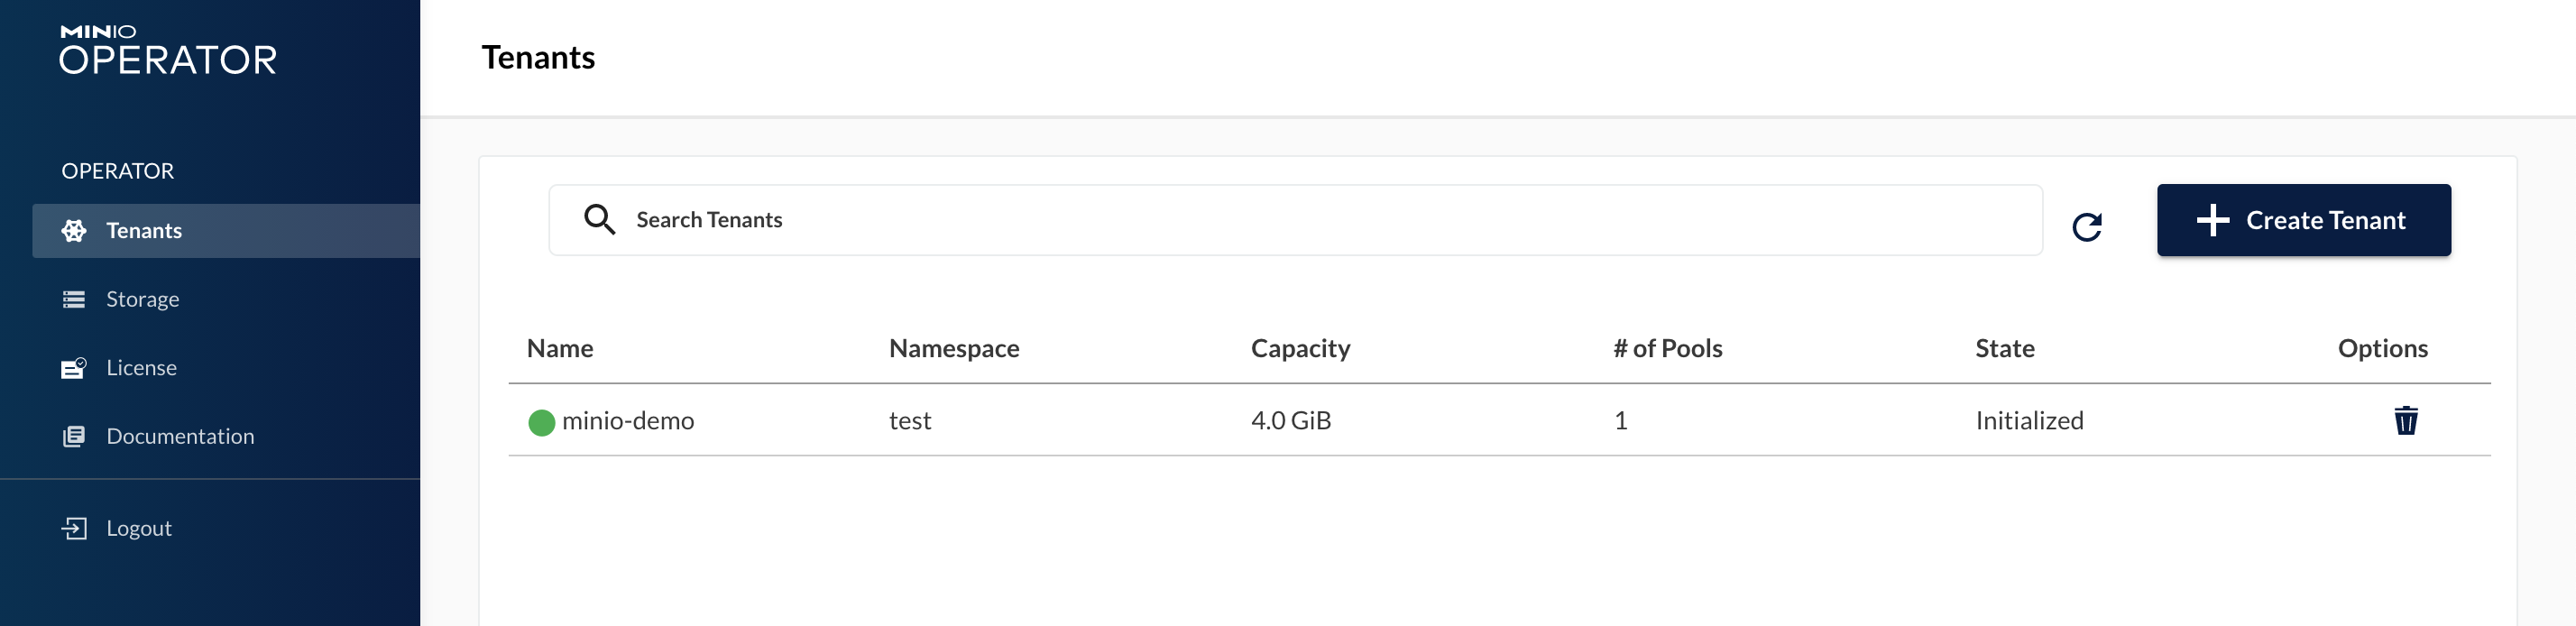
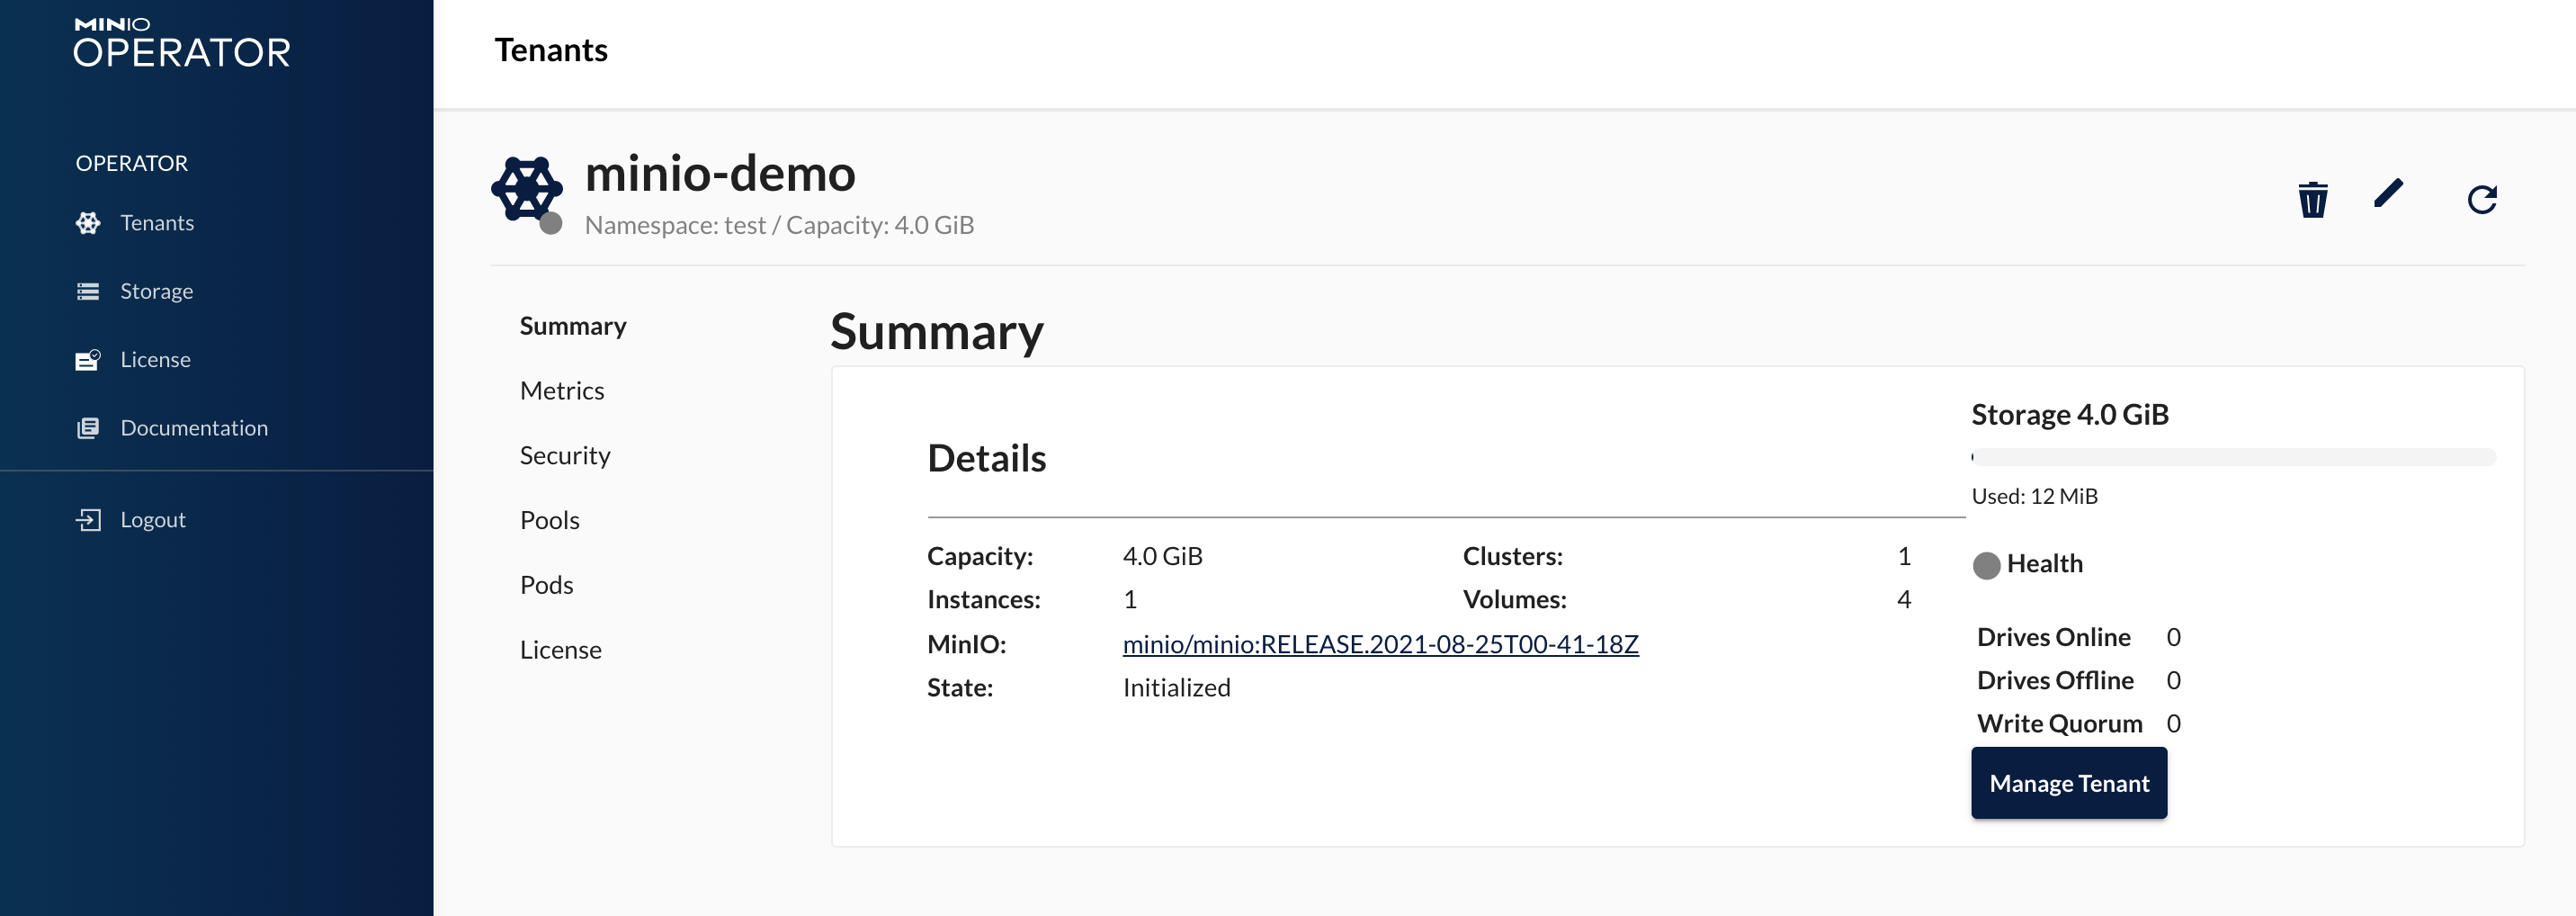
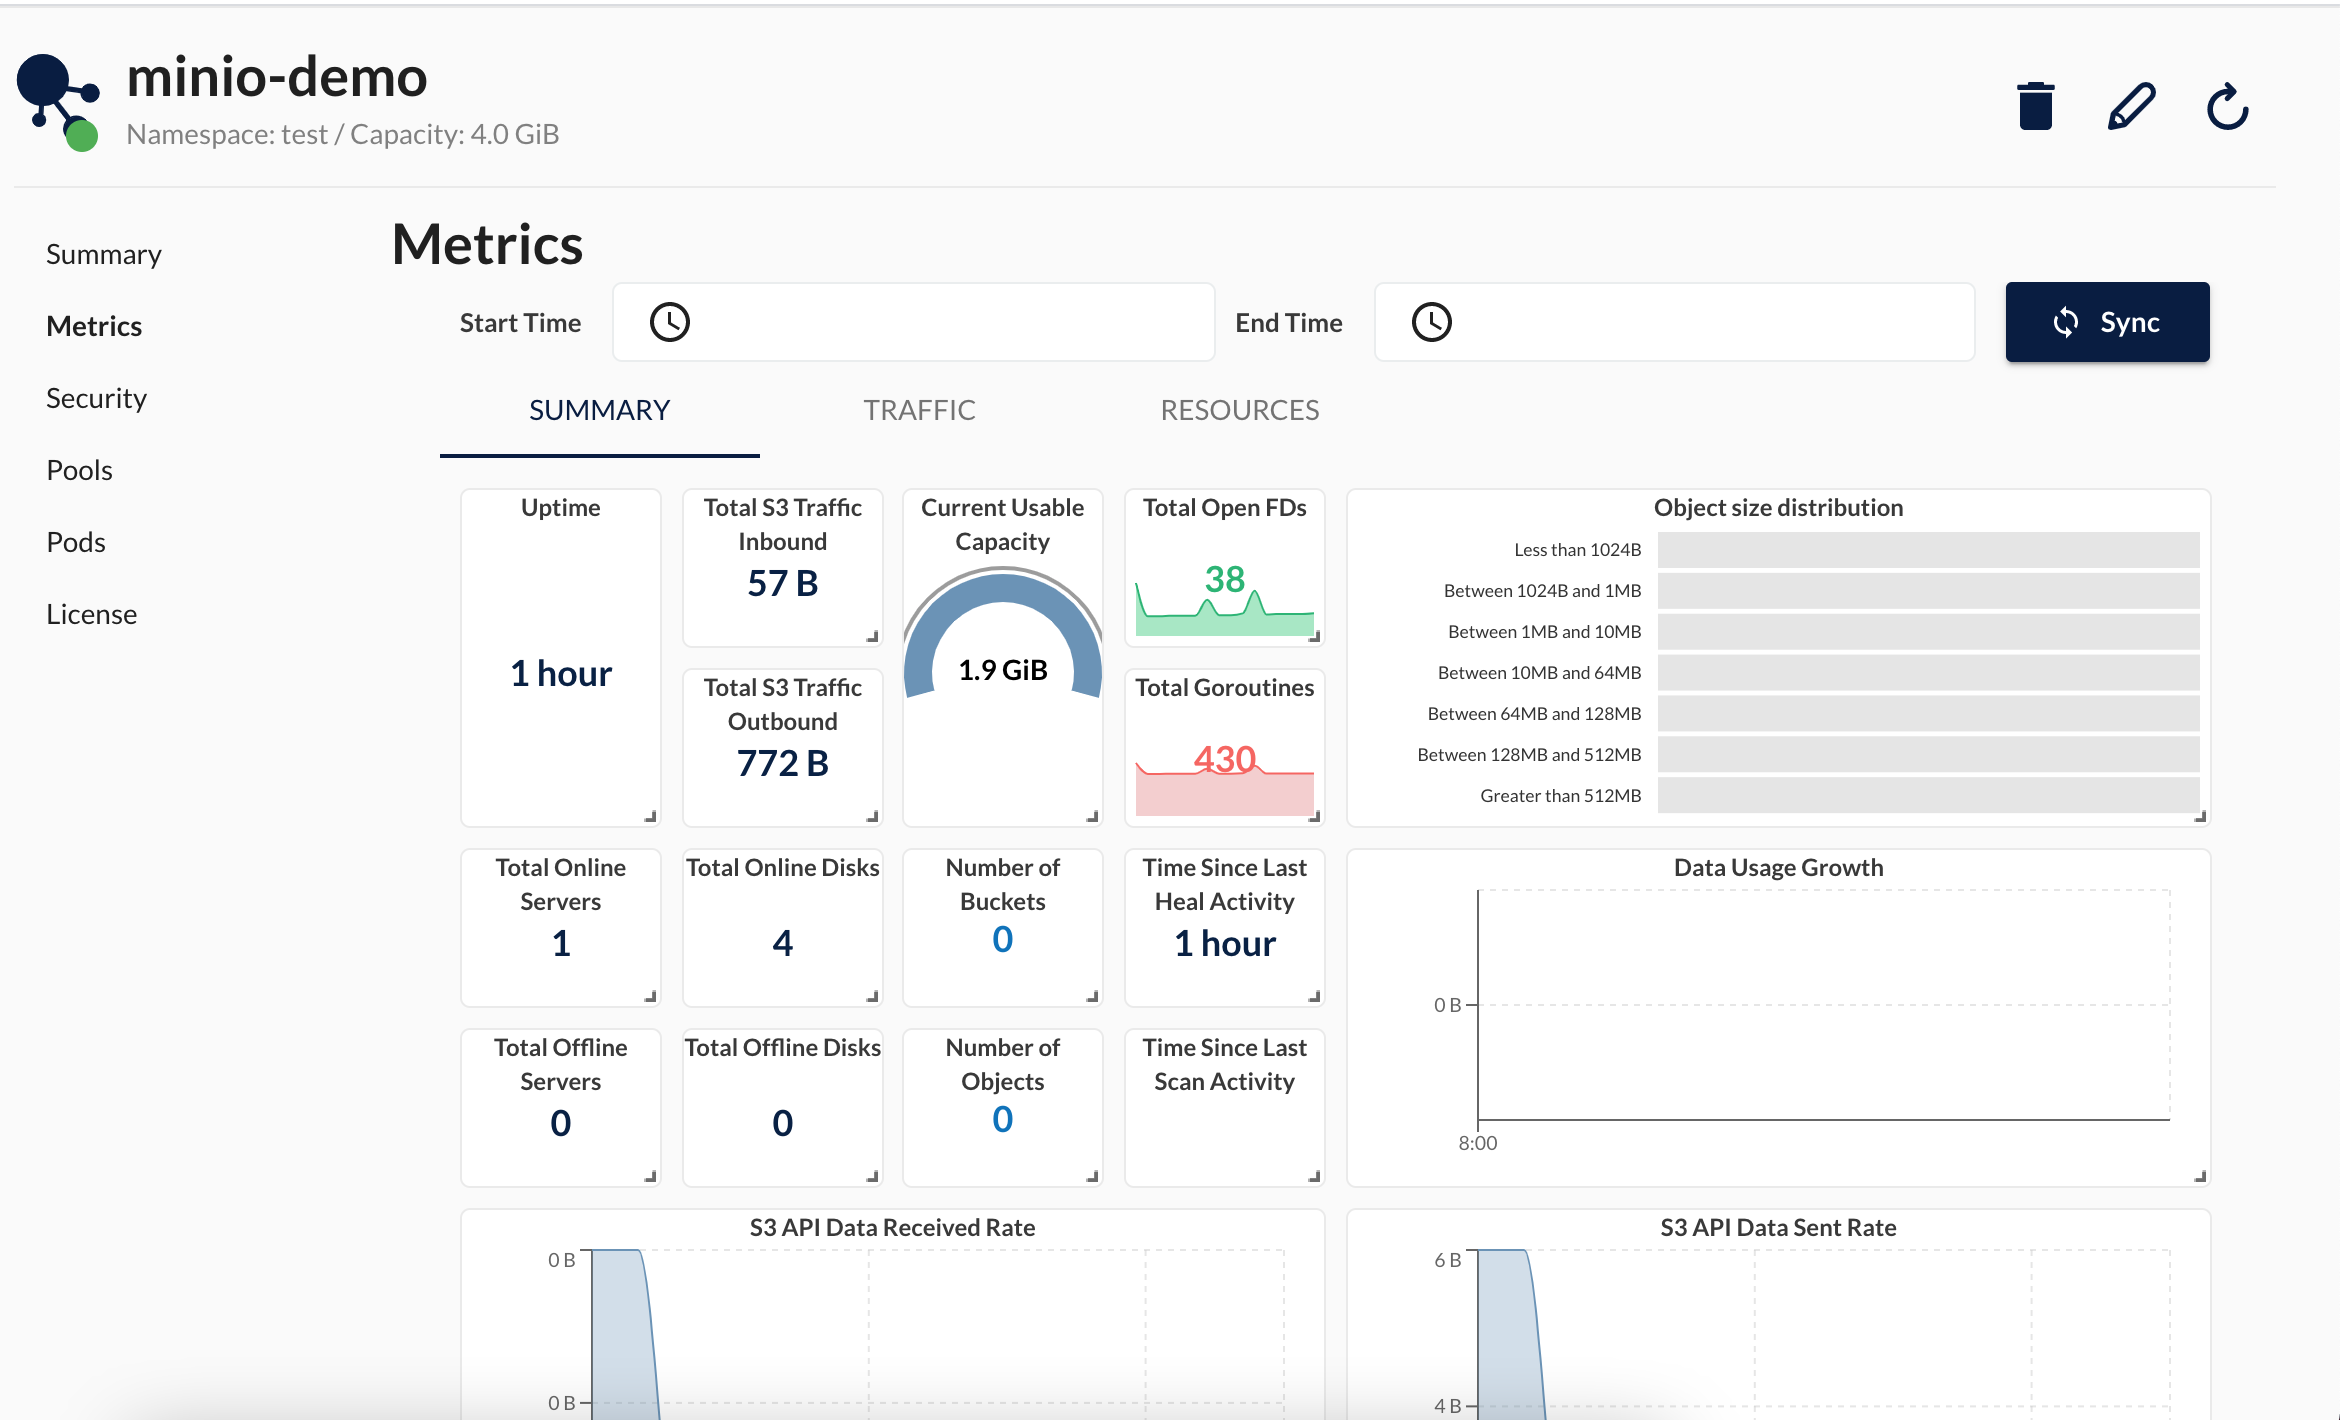
[root@master-01 demo]# kubectl apply -f demo.yaml  -n test 
secret/minio-creds-secret created
tenant.minio.min.io/minio-demo created
[root@master-01 demo]# kubectl -n test get pod
NAME READY STATUS RESTARTS AGE
minio-demo-ss-0-0 0/1 Running 0 7s
[root@master-01 demo]# kubectl -n test get tenants
NAME STATE AGE
minio-demo Provisioning MinIO Statefulset 18s

我们登陆我们的operator console 可以查看到新创建的名为minio-demo这个minio租户。

image-20210903151209339

image-20210903151231041

这个配置文件里禁用了tls,如果需要启用把requestAutoCert设置为true

更多的字段说明请参考租户api文档

监控minio

在浏览官方文档时我们发现官方提供的监控的示意图很酷炫,可以在console直接展示监控的dashboard

image-20210903151925852

官方提供了一个附带监控的租户的配置文件,如下

1
2
3
4
5
6
7
8
9
10
11
12
13
14
15
16
17
18
19
20
21
22
23
24
25
26
27
28
29
30
31
32
33
34
35
36
37
38
39
40
41
42
43
44
45
46
47
48
49
50
51
52
53
54
55
56
57
58
59
60
61
62
63
64
65
66
67
68
69
70
71
72
73
74
75
76
77
78
79
80
81
82
83
84
85
86
87
88
89
90
91
92
93
94
95
96
97
98
99
100
101
102
103
104
105
106
107
108
109
## Secret to be used as MinIO Root Credentials
apiVersion: v1
kind: Secret
metadata:
name: minio-creds-secret
type: Opaque
data:
## Access Key for MinIO Tenant, base64 encoded (echo -n 'minio' | base64)
accesskey: bWluaW8=
## Secret Key for MinIO Tenant, base64 encoded (echo -n 'minio123' | base64)
secretkey: bWluaW8xMjM=
---
## MinIO Tenant Definition
apiVersion: minio.min.io/v2
kind: Tenant
metadata:
name: minio-prometheus
## Optionally pass labels to be applied to the statefulset pods
labels:
app: minio
## Annotations for MinIO Tenant Pods
annotations:
prometheus.io/path: /minio/v2/metrics/cluster
prometheus.io/port: "9000"
prometheus.io/scrape: "true"

## If a scheduler is specified here, Tenant pods will be dispatched by specified scheduler.
## If not specified, the Tenant pods will be dispatched by default scheduler.
# scheduler:
# name: my-custom-scheduler

spec:
## Registry location and Tag to download MinIO Server image
image: minio/minio:RELEASE.2021-08-25T00-41-18Z
imagePullPolicy: IfNotPresent

## Secret with credentials to be used by MinIO Tenant.
## Refers to the secret object created above.
credsSecret:
name: minio-creds-secret

## Specification for MinIO Pool(s) in this Tenant.
pools:
## Servers specifies the number of MinIO Tenant Pods / Servers in this pool.
## For standalone mode, supply 1. For distributed mode, supply 4 or more.
## Note that the operator does not support upgrading from standalone to distributed mode.
- servers: 1

## volumesPerServer specifies the number of volumes attached per MinIO Tenant Pod / Server.
volumesPerServer: 4

## This VolumeClaimTemplate is used across all the volumes provisioned for MinIO Tenant in this Pool.
volumeClaimTemplate:
metadata:
name: data
spec:
accessModes:
- ReadWriteOnce
resources:
requests:
storage: 1Gi


## Mount path where PV will be mounted inside container(s).
mountPath: /export
## Sub path inside Mount path where MinIO stores data.
# subPath: /data

## Use this field to provide a list of Secrets with external certificates. This can be used to to configure
## TLS for MinIO Tenant pods. Create secrets as explained here:
## https://github.com/minio/minio/tree/master/docs/tls/kubernetes#2-create-kubernetes-secret
# externalCertSecret:
# - name: tls-ssl-minio
# type: kubernetes.io/tls

## Enable automatic Kubernetes based certificate generation and signing as explained in
## https://kubernetes.io/docs/tasks/tls/managing-tls-in-a-cluster
requestAutoCert: true

## Enable S3 specific features such as Bucket DNS which would allow `buckets` to be
## accessible as DNS entries of form `<bucketname>.minio.default.svc.cluster.local`
s3:
## This feature is turned off by default
bucketDNS: false

## This field is used only when "requestAutoCert" is set to true. Use this field to set CommonName
## for the auto-generated certificate. Internal DNS name for the pod will be used if CommonName is
## not provided. DNS name format is *.minio.default.svc.cluster.local
certConfig:
commonName: ""
organizationName: []
dnsNames: []

## PodManagement policy for MinIO Tenant Pods. Can be "OrderedReady" or "Parallel"
## Refer https://kubernetes.io/docs/tutorials/stateful-application/basic-stateful-set/#pod-management-policy
## for details.
podManagementPolicy: Parallel

## Prometheus setup for MinIO Tenant.
prometheus:
image: "prom/prometheus"
sidecarimage: "alpine"
initimage: "busybox"
diskCapacityGB: 5

## Prometheus Operator's Service Monitor for MinIO Tenant Pods.
prometheusOperator:
labels:
app: minio-sm

我们部署上面这个配置文件,值得注意的是这个配置文件会在要部署的minio租户的namespace下安装prometheus服务并生成一个servicemonitor

1
2
3
4
5
6
7
8
9
10
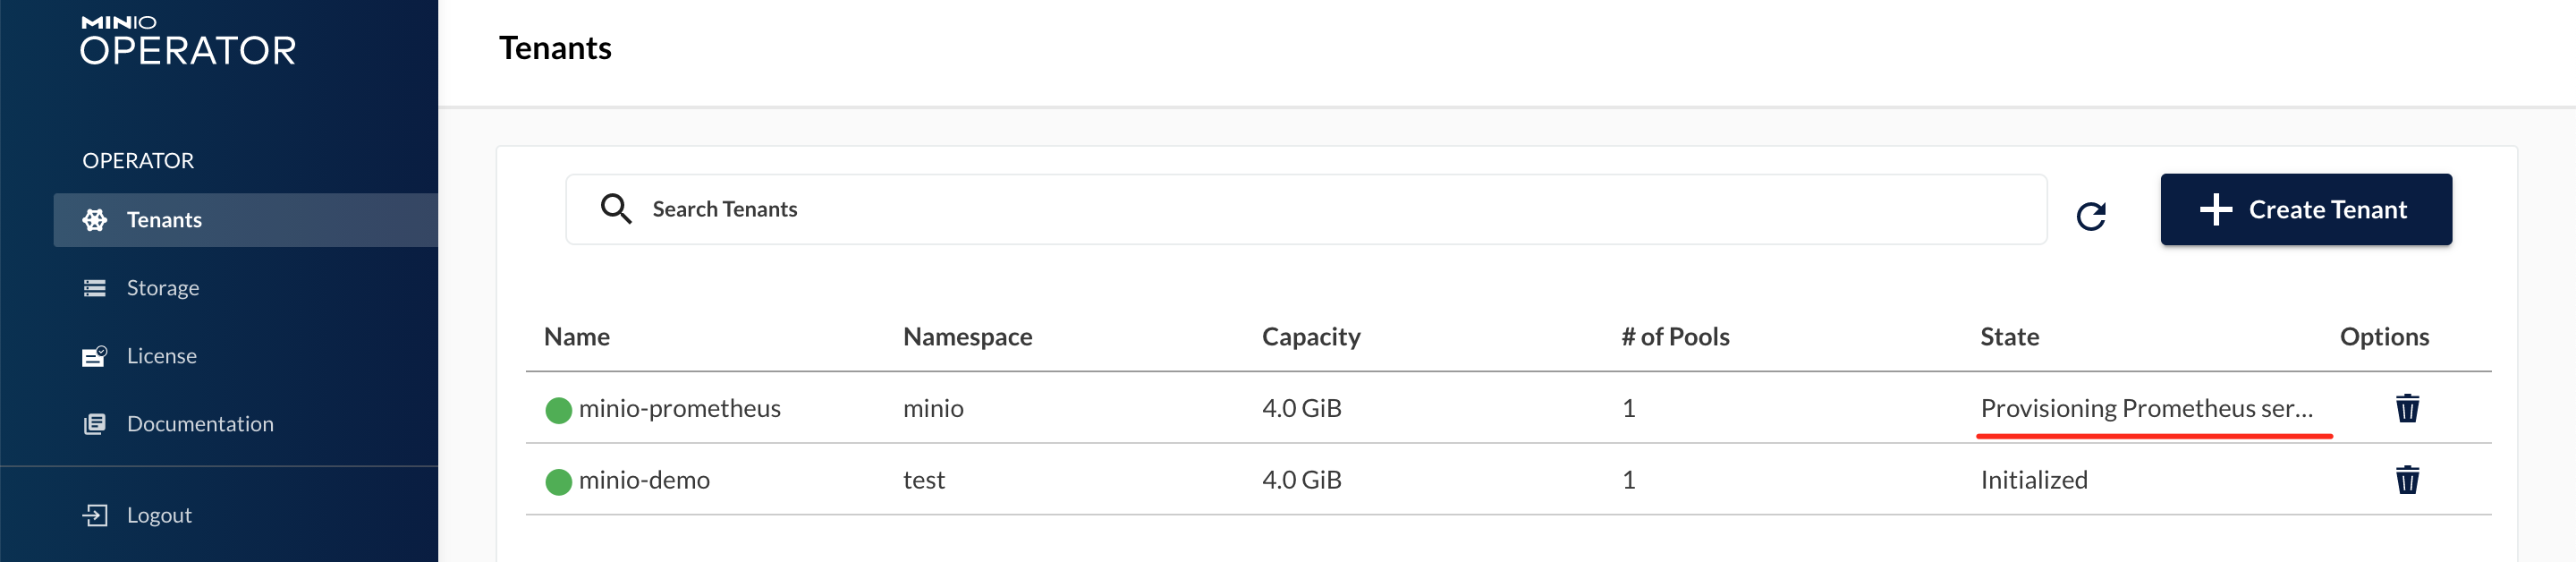
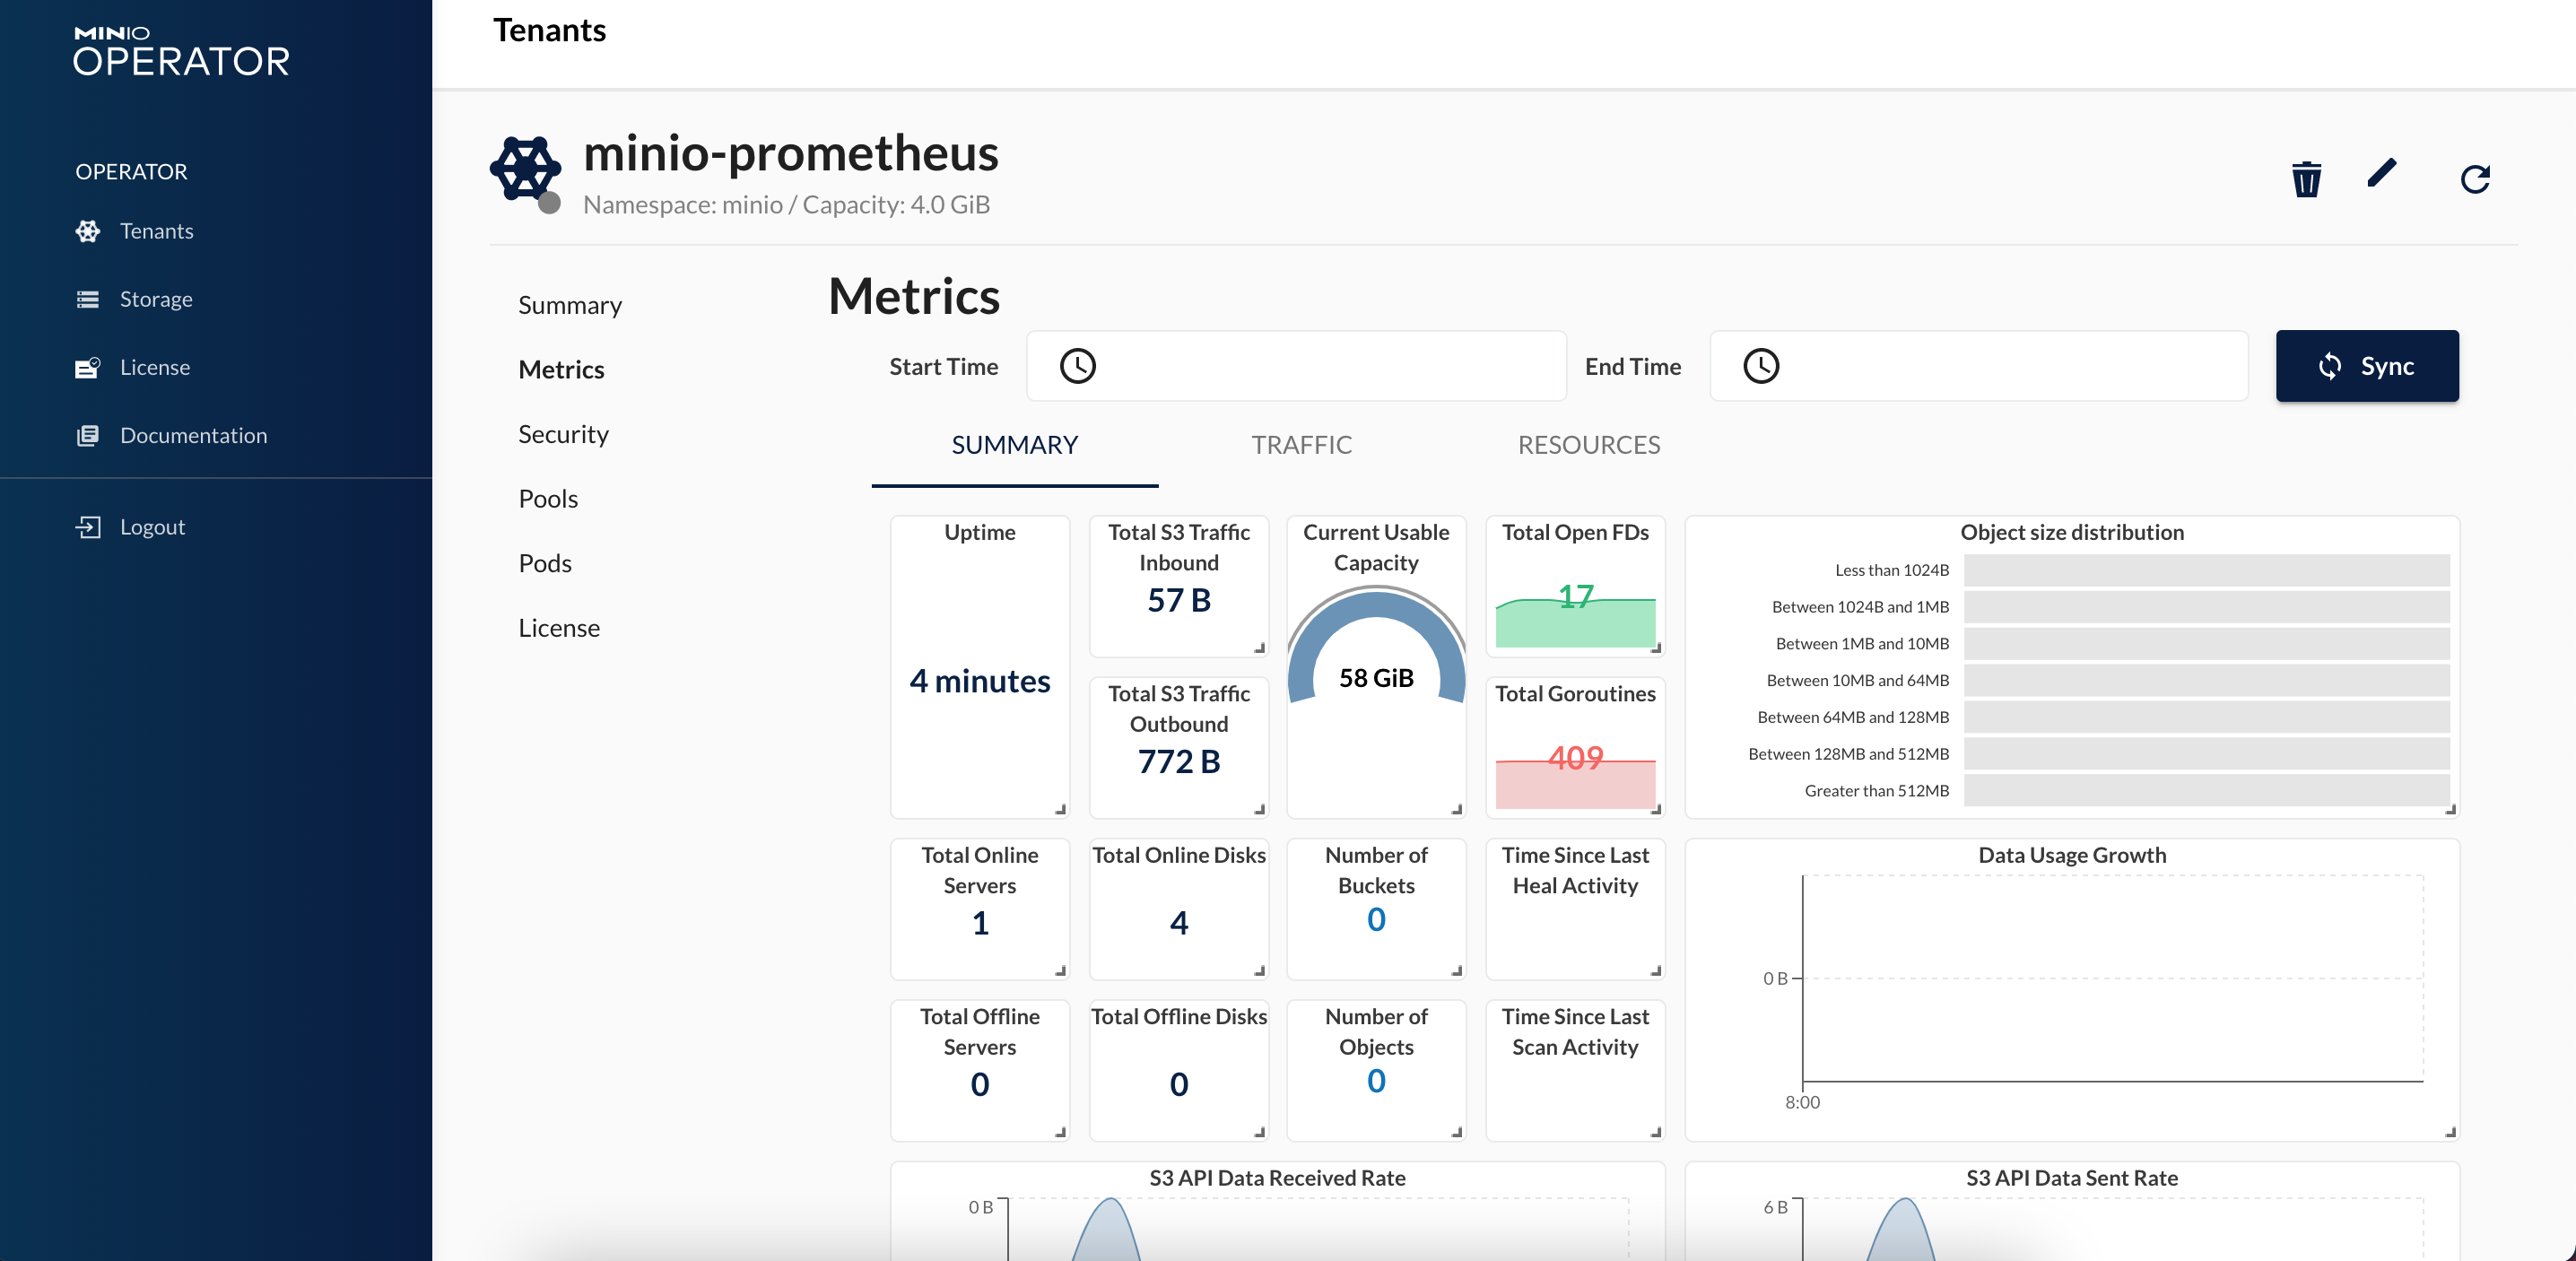
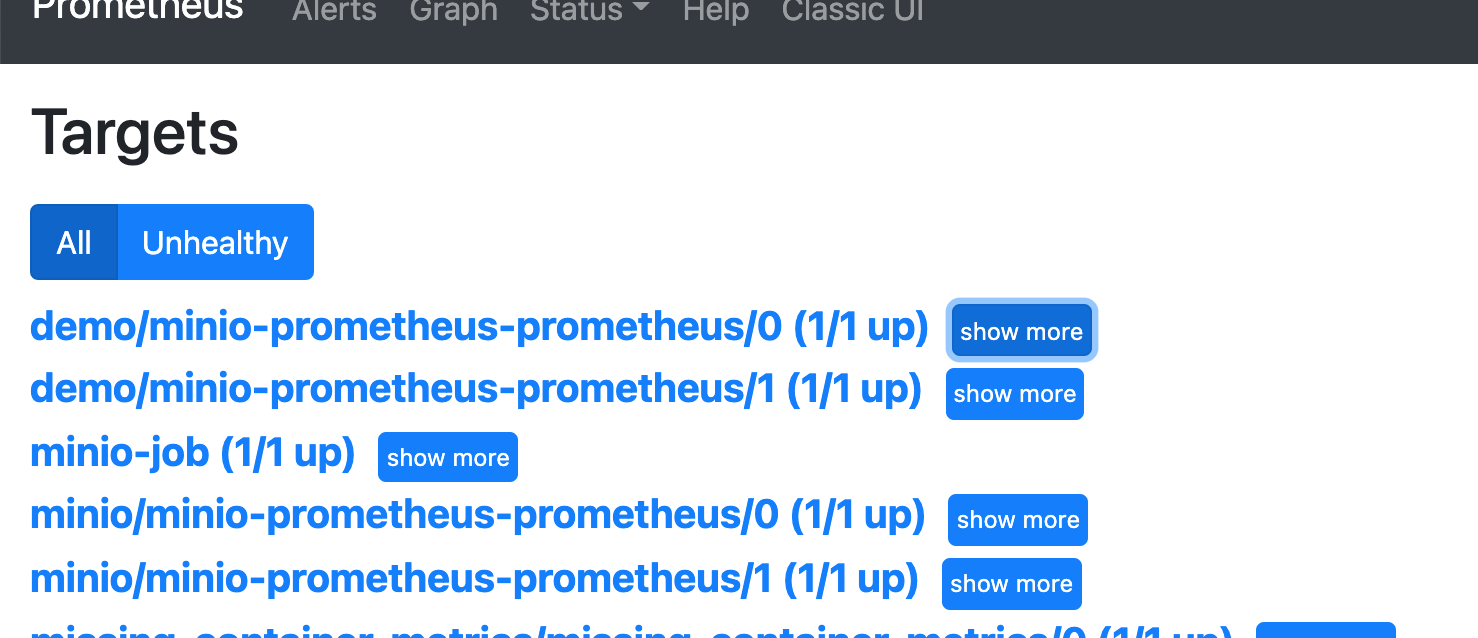
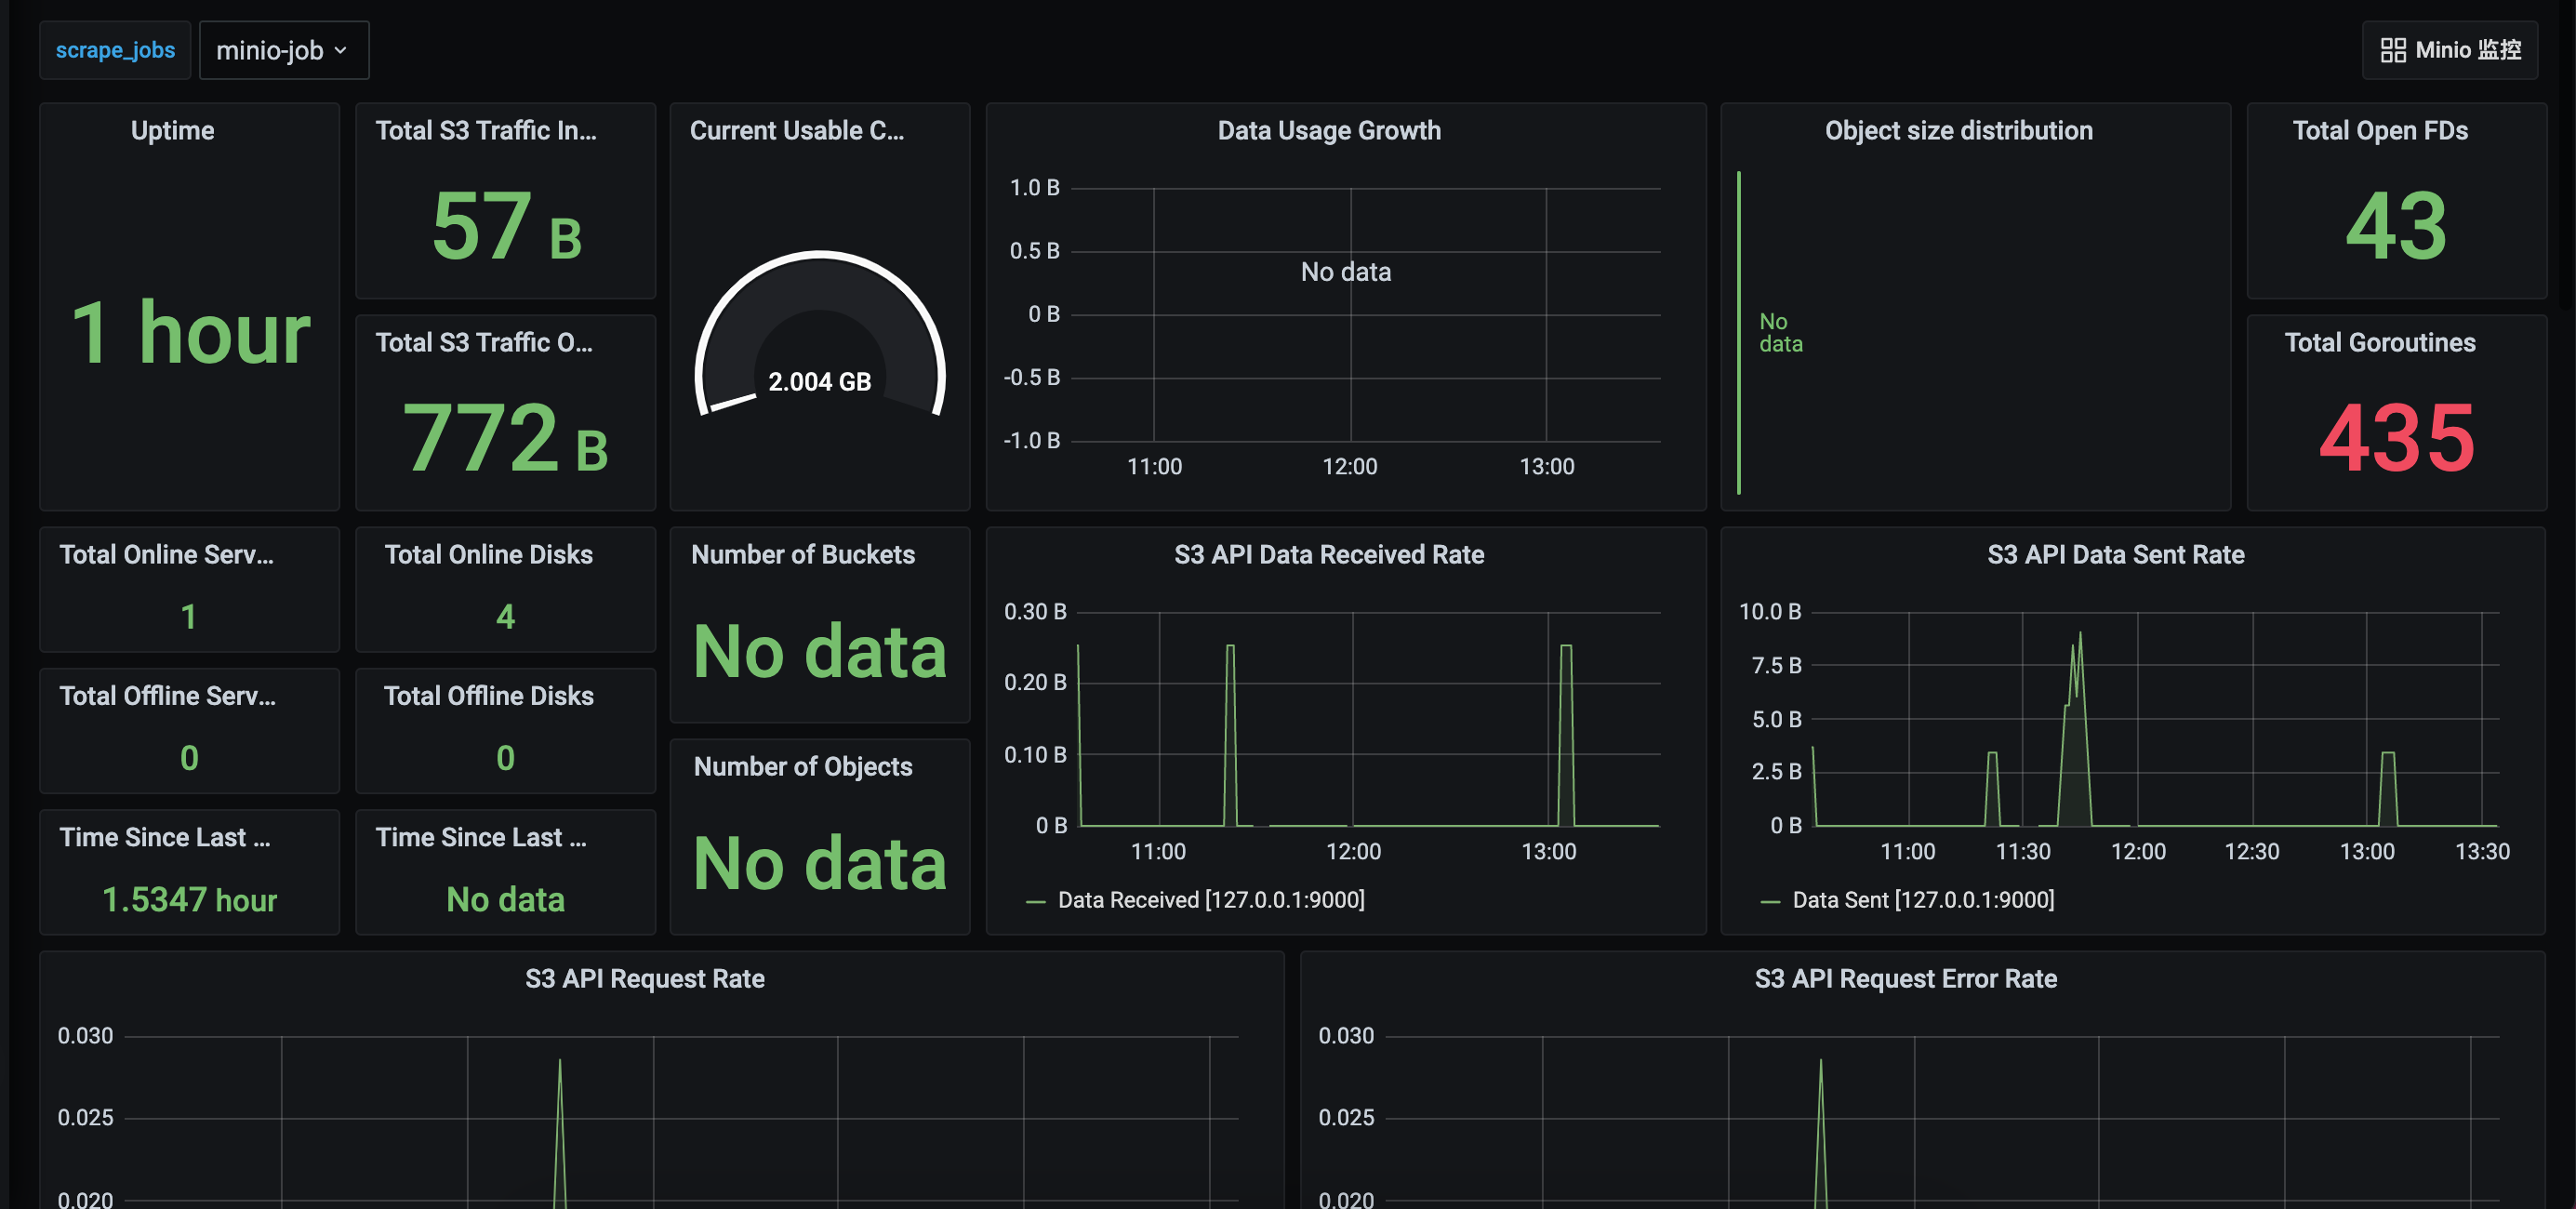
[root@master-01 demo]# kubectl apply -f demo-prometheus.yaml  -n minio 
secret/minio-creds-secret created
tenant.minio.min.io/minio-prometheus created
[root@master-01 demo]# kubectl get pod -n minio
NAME READY STATUS RESTARTS AGE
minio-prometheus-prometheus-0 2/2 Running 0 3m6s
minio-prometheus-ss-0-0 1/1 Running 0 4m
[root@master-01 demo]# kubectl -n minio get servicemonitors.monitoring.coreos.com
NAME AGE
minio-prometheus-prometheus 5m19s

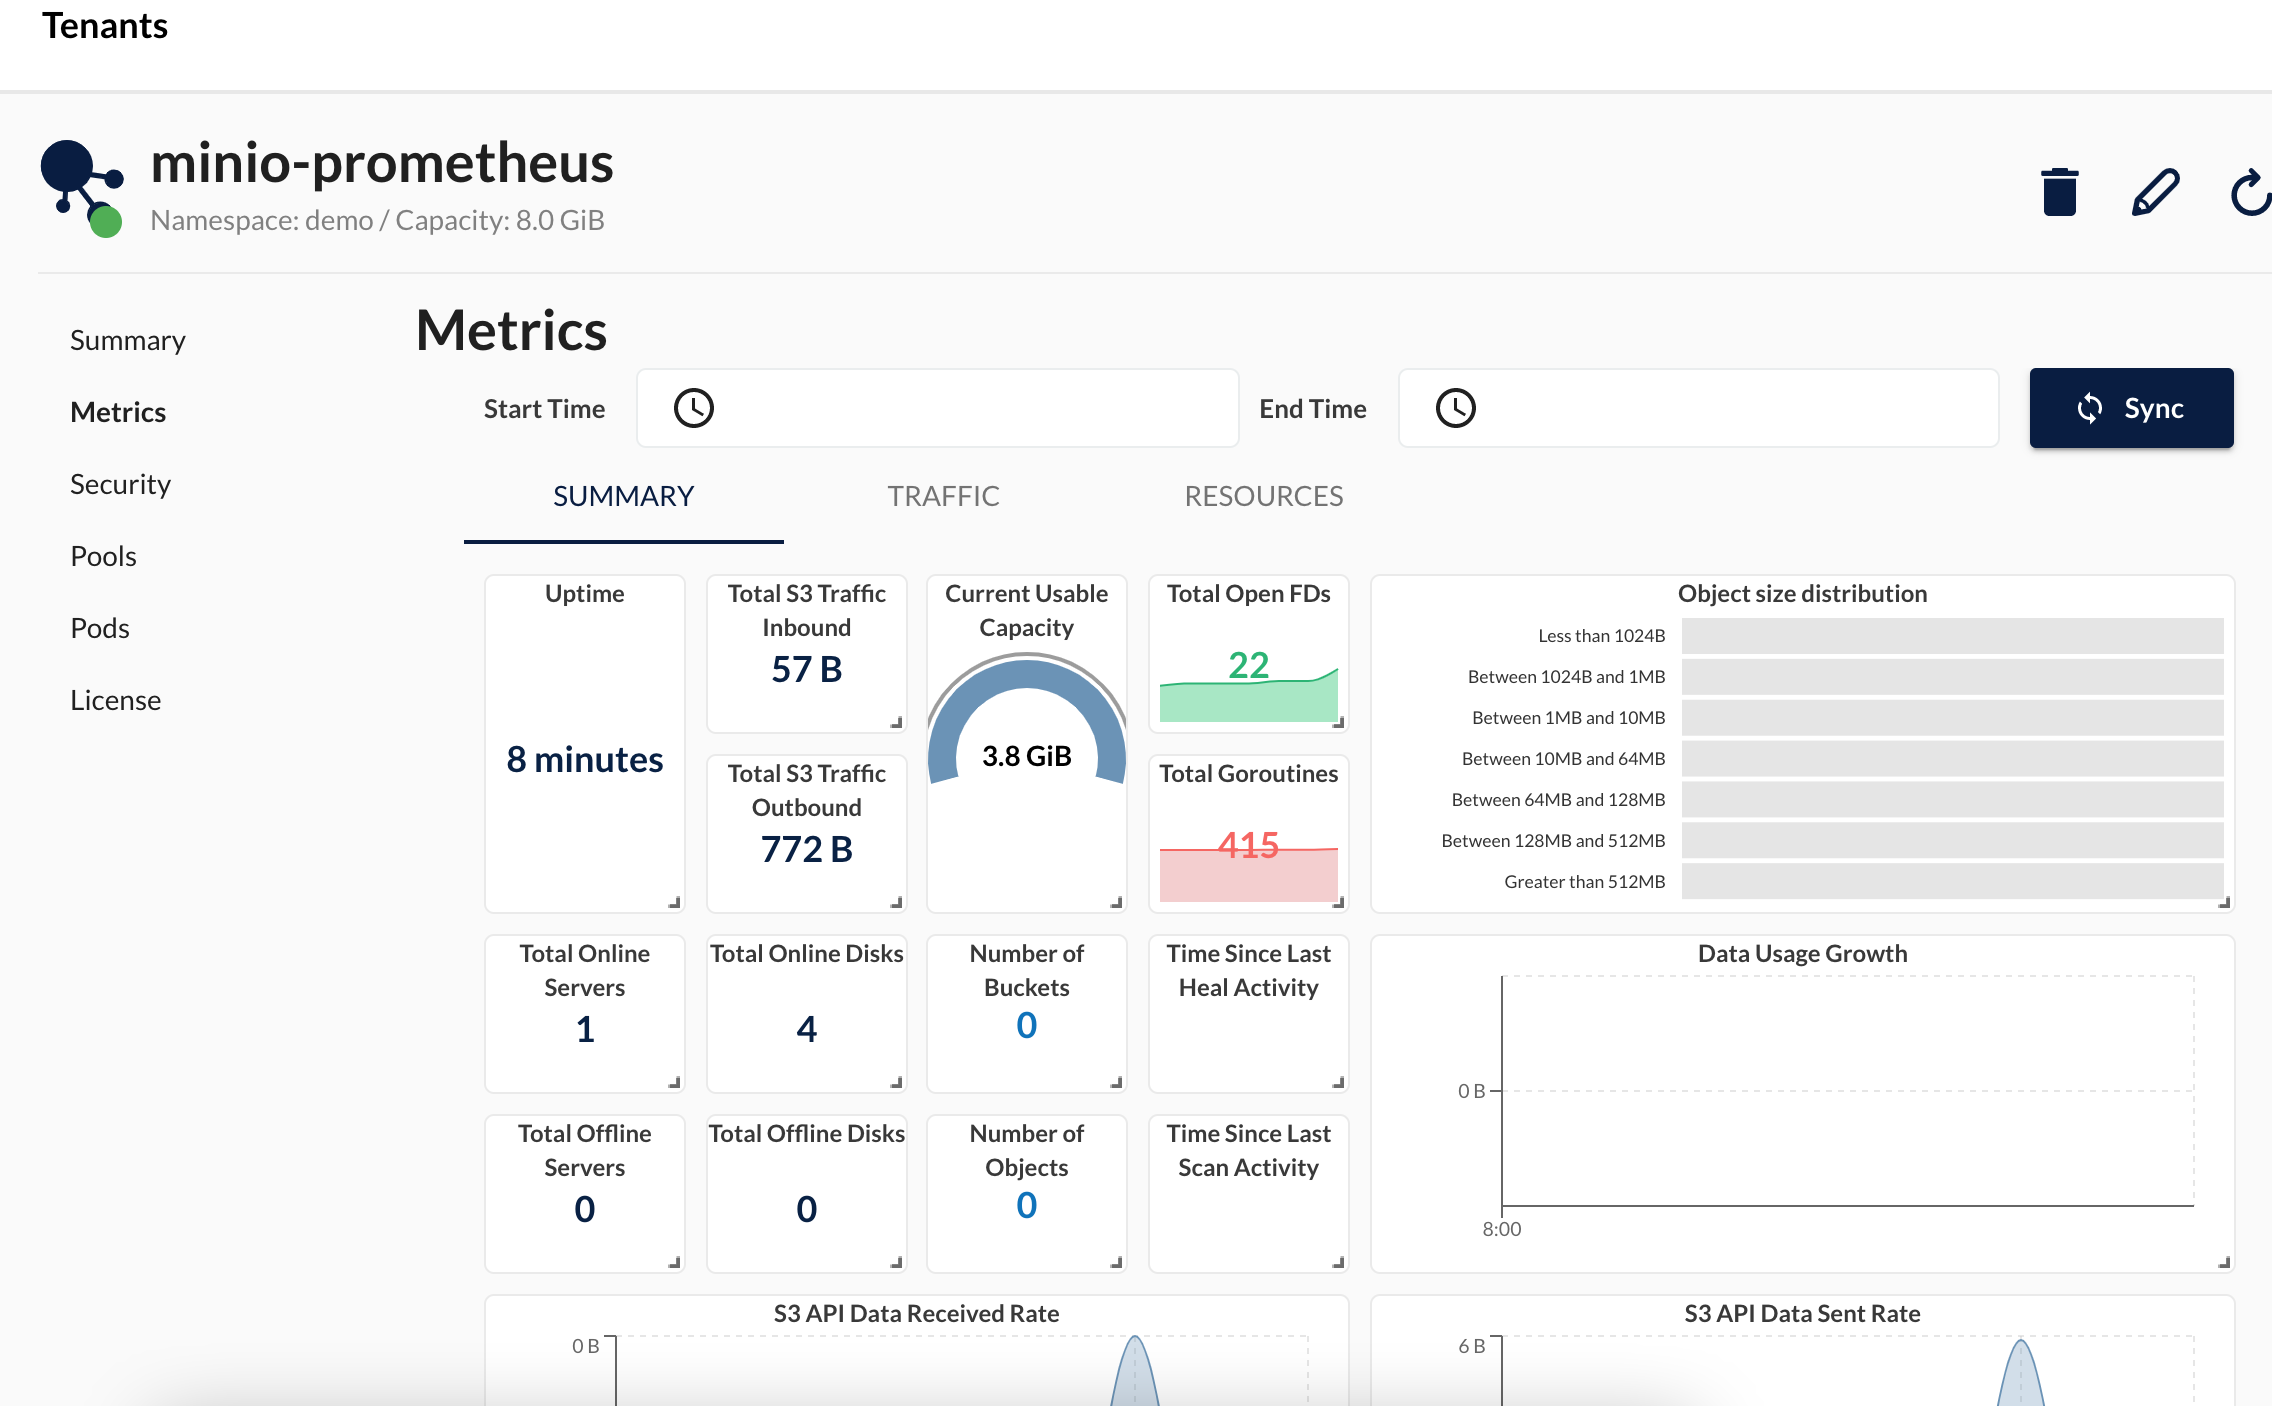
这里我们在控制台上看到新创建的minio-prometheus租户的state是Provisioning Prometheus service monitor

image-20210903153110638

我们在这个租户的详情页的meteics下可以看到dashboar

image-20210903153639676

使用静态配置对接现有prometheus监控

我们发现上面那种需要在namespace下安装prometheus,如果我们在很多namespace下部署minio租户,就需要安装很多Prometheus,并且我们的k8s集群中往往本身就有一套prometheus监控,这里我们尝试一下接入集群现有的promet heus。

MinIO 为集群级指标提供了一个抓取端点:

1
http://minio.example.net:9000/minio/v2/metrics/cluster

默认情况下,MinIO 需要身份验证才能抓取metrics,我们可以在安装minio 租户的配置文件中将MINIO_PROMETHEUS_AUTH_TYPE设置为public来忽略验证。

1
2
3
4
5
6
7
......
podManagementPolicy: Parallel

## 添加如下配置
env:
- name: MINIO_PROMETHEUS_AUTH_TYPE
value: public

不过建议还是不要将MINIO_PROMETHEUS_AUTH_TYPE设置为public,使用身份验证并不会为监控增加多少难度,反而会降低安全性。

我们需要创建scrape_configs用于收集集群指标的条目。下面是一个示例

1
2
3
4
5
6
7
scrape_configs:
- job_name: minio-job
bearer_token: <secret>
metrics_path: /minio/v2/metrics/cluster
scheme: https
static_configs:
- targets: ['minio.example.net:9000']
job_name 抓取作业的名称。
bearer_token 生成的 JWT 令牌。
targets MinIO 部署的端点。您可以指定部署中的任何节点来收集集群指标。对于负载均衡器管理 MinIO 节点之间连接的集群,指定负载均衡器的地址。

我们可以使用命令mc admin prometheus generate生成 JWT 不记名令牌,这里我们演示为刚才在test这个namespace下的minio配置监控

1
2
3
4
5
6
7
8
9
10
11
12
13
14
15
16
17
18
19
[root@master-01 demo]# kubectl get svc -n test
NAME TYPE CLUSTER-IP EXTERNAL-IP PORT(S) AGE
minio ClusterIP 10.101.93.169 <none> 443/TCP 93s
minio-demo-console ClusterIP 10.111.196.65 <none> 9443/TCP 93s
minio-demo-hl ClusterIP None <none> 9000/TCP 93s
minio-test ClusterIP 10.104.191.105 <none> 80/TCP 2d
[root@master-01 demo]# mc --insecure alias set myminio https://10.101.93.169 minio minio123
Added `myminio` successfully.


[root@master-01 demo]# mc admin prometheus generate myminio
scrape_configs:
- job_name: minio-job
bearer_token: eyJhbGciOiJIUzUxMiIsInR5cCI6IkpXVCJ9.eyJleHAiOjQ3ODQyNTkwNzEsImlzcyI6InByb21ldGhldXMiLCJzdWIiOiJtaW5pbyJ9.U-y0XUg3hKPOiueceXvzgOZSIrunPGUFBtipESDaXIyKJpWUfZVLLqxZVFI6cV7u3-zBY58JmSM6PwrGXeP_Dw
metrics_path: /minio/v2/metrics/cluster
scheme: https
static_configs:
- targets: [10.101.93.169]

这里我们使用的是prometheus-operator 部署的prometheus,这里我们使用静态配置的方式,我们先修改prometheus-prometheus.yaml 文件

1
2
3
4
5
6
7
8
9
10
11
12
13
14
15
.....
ruleSelector:
matchLabels:
prometheus: k8s
role: alert-rules
###添加开始
additionalScrapeConfigs:
name: additional-configs
key: prometheus-additional.yaml
###添加结束
securityContext:
fsGroup: 2000
runAsNonRoot: true
runAsUser: 1000
......

创建文件prometheus-additional.yaml

1
2
3
4
5
6
7
8
- job_name: minio-job
bearer_token: eyJhbGciOiJIUzUxMiIsInR5cCI6IkpXVCJ9.eyJleHAiOjQ3ODQyNTkwNzEsImlzcyI6InByb21ldGhldXMiLCJzdWIiOiJtaW5pbyJ9.U-y0XUg3hKPOiueceXvzgOZSIrunPGUFBtipESDaXIyKJpWUfZVLLqxZVFI6cV7u3-zBY58JmSM6PwrGXeP_Dw
metrics_path: /minio/v2/metrics/cluster
scheme: https
tls_config:
insecure_skip_verify: true
static_configs:
- targets: [minio.test.svc.cluster.local]

这里建议把targets修改为service的名称,pod内是可以正确识别的,同时要忽略证书认证。

执行下面命令,将配置生成为secret

1
kubectl create secret generic additional-configs --from-file=prometheus-additional.yaml -n monitoring

然后我们稍等片刻就可以在prometheus的target上看到这个job

![image-20210906101117722](/Users/ls/Library/Application Support/typora-user-images/image-20210906101117722.png)

这个时候我们还需要修改mino租户的配置文件,让租户能够去这个prometheus上去拿到监控信息

1
2
3
4
5
6
7
8
9
......
podManagementPolicy: Parallel

## 添加如下配置
env:
- name: MINIO_PROMETHEUS_URL
value: "http://prometheus-k8s.monitoring:9090"
- name: MINIO_PROMETHEUS_JOB_ID
value: minio-job

参数说明:

MINIO_PROMETHEUS_URL: 指定配置为抓取 MinIO 指标的 Prometheus 服务的 URL

MINIO_PROMETHEUS_JOB_ID: 指定用于抓取 MinIO 指标的自定义 Prometheus JOB ID

更新服务后我们就可以在控制台中看到监控信息

image-20210906131951086

这里需要注意,如果监控多个namespace下的minio租户,我们需要在prometheus的配置文件里为每个namesaoce下的租户创建一个job_name,类似如下:

1
2
3
4
5
6
7
8
- job_name: minio-job
......
static_configs:
- targets: [minio.test.svc.cluster.local]
- job_name: minio-cache
......
static_configs:
- targets: [minio.cache.svc.cluster.local]

同时也别忘了每个租户要使用对应自己的MINIO_PROMETHEUS_JOB_ID

使用servicemonitor对接现有监控

在上面使用手动创建配置文件的方式加载进prometheus,这种如果我们需要为每个租户手动创建监控的job,在我们之前使用官方配置文件创建我们发现可以自动生成servicemonitor,但是官方的这种适合每个namespace下都安装prometheus,我们看下存在哪些问题:

我们先查看一下自动生成servicemonitor

1
2
3
4
5
6
7
8
9
10
11
12
13
14
15
16
17
18
19
20
21
22
23
24
25
26
27
28
29
30
31
32
33
34
35
36
37
38
39
40
41
[root@master-01 demo]# kubectl -n minio get servicemonitors.mon  minio-prometheus-prometheus -o yaml 
apiVersion: monitoring.coreos.com/v1
kind: ServiceMonitor
metadata:
creationTimestamp: "2021-09-06T05:48:28Z"
generation: 1
labels:
app: minio-sm
name: minio-prometheus-prometheus
namespace: minio
spec:
endpoints:
- bearerTokenSecret:
key: token
name: minio-prometheus-prom-sm-secret
interval: 30s
path: /minio/v2/metrics/node
port: https-minio
scheme: https
scrapeTimeout: 2s
tlsConfig:
ca: {}
cert: {}
insecureSkipVerify: true
- bearerTokenSecret:
key: token
name: minio-prometheus-prom-sm-secret
interval: 30s
path: /minio/v2/metrics/cluster
port: https-minio
scheme: https
scrapeTimeout: 2s
tlsConfig:
ca: {}
cert: {}
insecureSkipVerify: true
namespaceSelector: {}
selector:
matchLabels:
v1.min.io/tenant: minio-prometheusprom-service-monitor

这里我们可以看到这个servicemonitor是去寻找标签为v1.min.io/tenant: minio-prometheusprom-service-monitor的service,同时并没有配置job_name

我们在prometheus中可以看到这个servicemonitor对应的config配置如下

1
2
3
4
5
6
7
8
9
10
11
12
13
14
15
16
17
18
- job_name: minio/minio-prometheus-prometheus/1
honor_timestamps: true
scrape_interval: 30s
scrape_timeout: 2s
metrics_path: /minio/v2/metrics/cluster
scheme: https
bearer_token: <secret>
tls_config:
insecure_skip_verify: true
relabel_configs:
.......
- source_labels: [__meta_kubernetes_service_name]
separator: ;
regex: (.*)
target_label: job
replacement: ${1}
action: replace

这里我们可以看到job的名称实际上取得是service的name,我们再来查看一下带有v1.min.io/tenant: minio-prometheusprom-service-monitor标签的service

1
2
3
4
5
6
[root@master-01 demo]# kubectl -n demo  get svc --show-labels 
NAME TYPE CLUSTER-IP EXTERNAL-IP PORT(S) AGE LABELS
minio ClusterIP 10.106.7.118 <none> 443/TCP 78m v1.min.io/tenant=minio-prometheusprom-service-monitor
minio-prometheus-console ClusterIP 10.108.222.5 <none> 9443/TCP 78m <none>
minio-prometheus-hl ClusterIP None <none> 9000/TCP 78m v1.min.io/tenant=minio-prometheus
minio-prometheus-prometheus-hl-svc ClusterIP None <none> 9090/TCP 78m v1.min.io/prometheus=minio-prometheus-prometheus

这样就存在一个问题就是如果在多个namespace下都部署了,就都会取这个名称空间下minio这个service的名称作为job名称,如下,虽然在prometheus中同一个job对应多个target,我们可以通过namespace区分,但是我们租户配置文件里只有一个MINIO_PROMETHEUS_JOB_ID 无法区分同一个job下多个不同的target,虽然最终能显示dashboar,但是我们是无法判断实际现实的是不是这个租户的监控数据

image-20210906140241115

image-20210906140430877

这里我们采用如下办法

修改minio的标签,将 minio这个service的标签v1.min.io/tenant 的values替换为别的值,同时新建一个service,内容与minio这个service相同但是将标签替换为v1.min.io/tenant: minio-prometheusprom-service-monitor,这样servicemonitor就会去寻找我们先创建的service,去取它的名称作为job name,这样就避免多个租户最终job name一样

1
2
3
4
5
6
7
8
9
10
11
12
13
14
15
16
17
18
podManagementPolicy: Parallel
### 修改标签
serviceMetadata:
minioServiceLabels:
v1.min.io/tenant: minio
minioServiceAnnotations:
v2.min.io: minio-svc

## Prometheus Operator's Service Monitor for MinIO Tenant Pods.
prometheusOperator:
labels:
app: minio-sm
env:
- name: MINIO_PROMETHEUS_URL
value: "http://prometheus-k8s.monitoring:9090"
- name: MINIO_PROMETHEUS_JOB_ID
value: minio-demo # 这里要和你新建的service 名称一致

注意 如果是已经安装的 需要将以前安装的删除 或者去手动修改s

我们可以看到新部署的服务minio这个svc的标签已经改变为我们预设的了,此时我们新添加一个名为minio-demo的service

1
2
3
4
5
6
7
8
9
10
11
12
13
14
15
16
17
18
19
20
21
22
23
24
25
26
27
28
29
30
31
32
33
34
35
36
37
[root@master-01 demo]# kubectl -n demo  get svc --show-labels 
NAME TYPE CLUSTER-IP EXTERNAL-IP PORT(S) AGE LABELS
minio ClusterIP 10.107.145.182 <none> 443/TCP 2m17s v1.min.io/tenant=minio
minio-prometheus-console ClusterIP 10.108.56.126 <none> 9443/TCP 2m17s <none>
minio-prometheus-hl ClusterIP None <none> 9000/TCP 2m16s v1.min.io/tenant=minio-prometheus
[root@master-01 demo]# kubectl -n demo get svc minio -o yaml > minio-demo-svc.yaml
[root@master-01 demo]# vi minio-demo-svc.yaml
[root@master-01 demo]# cat minio-demo-svc.yaml
apiVersion: v1
kind: Service
metadata:
annotations:
v2.min.io: minio-svc
labels:
v1.min.io/tenant: minio-prometheusprom-service-monitor
name: minio-demo
namespace: demo
spec:
ports:
- name: https-minio
port: 443
protocol: TCP
targetPort: 9000
selector:
v1.min.io/tenant: minio-prometheus
sessionAffinity: None
type: ClusterIP
[root@master-01 demo]# kubectl apply -f minio-demo-svc.yaml -n demo
service/minio-demo created
[root@master-01 demo]# kubectl -n demo get svc --show-labels
NAME TYPE CLUSTER-IP EXTERNAL-IP PORT(S) AGE LABELS
minio ClusterIP 10.107.145.182 <none> 443/TCP 7m18s v1.min.io/tenant=minio
minio-demo ClusterIP 10.108.154.66 <none> 443/TCP 5s v1.min.io/tenant=minio-prometheusprom-service-monitor
minio-prometheus-console ClusterIP 10.108.56.126 <none> 9443/TCP 7m18s <none>
minio-prometheus-hl ClusterIP None <none> 9000/TCP 7m17s v1.min.io/tenant=minio-prometheus


此时我们可以在prometheus上看到我们的job name已经变化为minio-demo了

image-20210906153926595

我们通过minio控制台看一下监控数据是否准确,这里为了区分我们新创建的是四块存储 每块存储2gb,这里显示正常,一共8g,可用4g。

image-20210906154416606

建议使用这种方式监控,也不需要生成jwt token,还避免了手动配置prometheus

接入grafana

MinIO 还提供了一个Grafana 仪表板(https://grafana.com/grafana/dashboards/13502)用于可视化收集的指标。我们可以将这个dashboard导入到我们的grafana中

image-20210906133453435

如果出现如下问题

image-20210906133348446

我们去这个dashboard的设置里修改Variables中的变量scrape_jobs,注意这里可能虽然页面显示正常,但是实际点击进去query中的语句是异常的,我们需要修改一下即可。

image-20210906133551962

image-20210906133757344

修改为如下,保存后页面就可以正常显示了

image-20210906133838346

CATALOG
  1. 1. 使用配置文件部署minio租户
  2. 2. 监控minio
  3. 3. 使用静态配置对接现有prometheus监控
  4. 4. 使用servicemonitor对接现有监控
  5. 5. 接入grafana